Showing posts with label toor dal. Show all posts

Thursday, August 25, 2011

Mullangi/Daikon Radish Sambar

Dear Foodies,


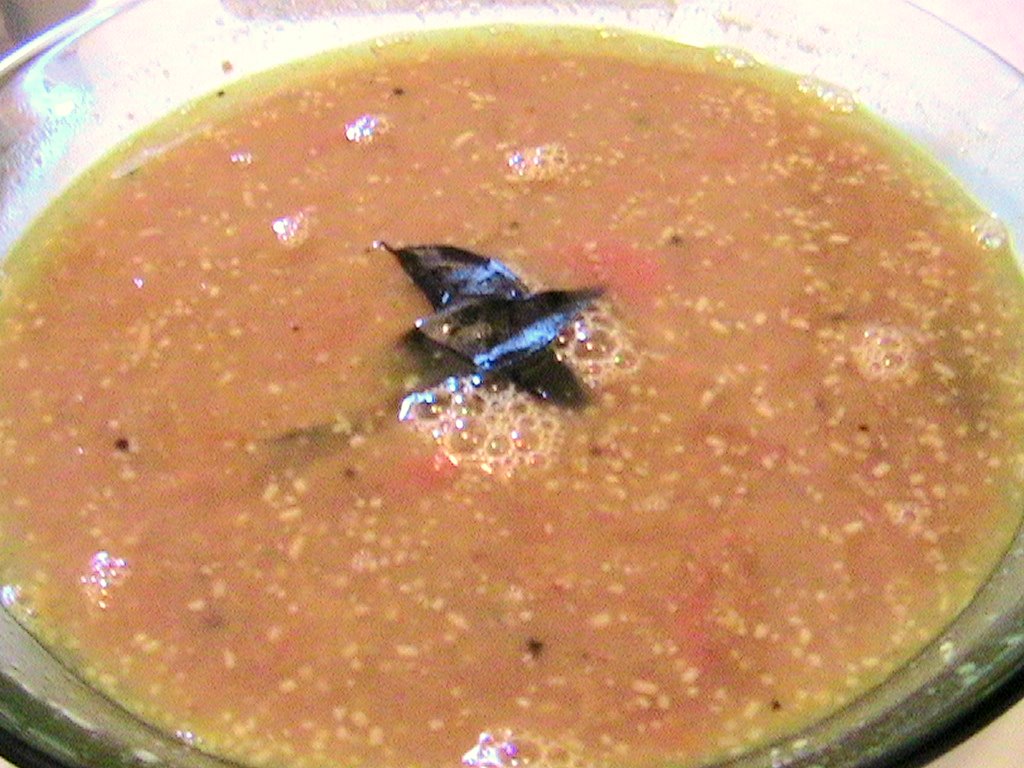
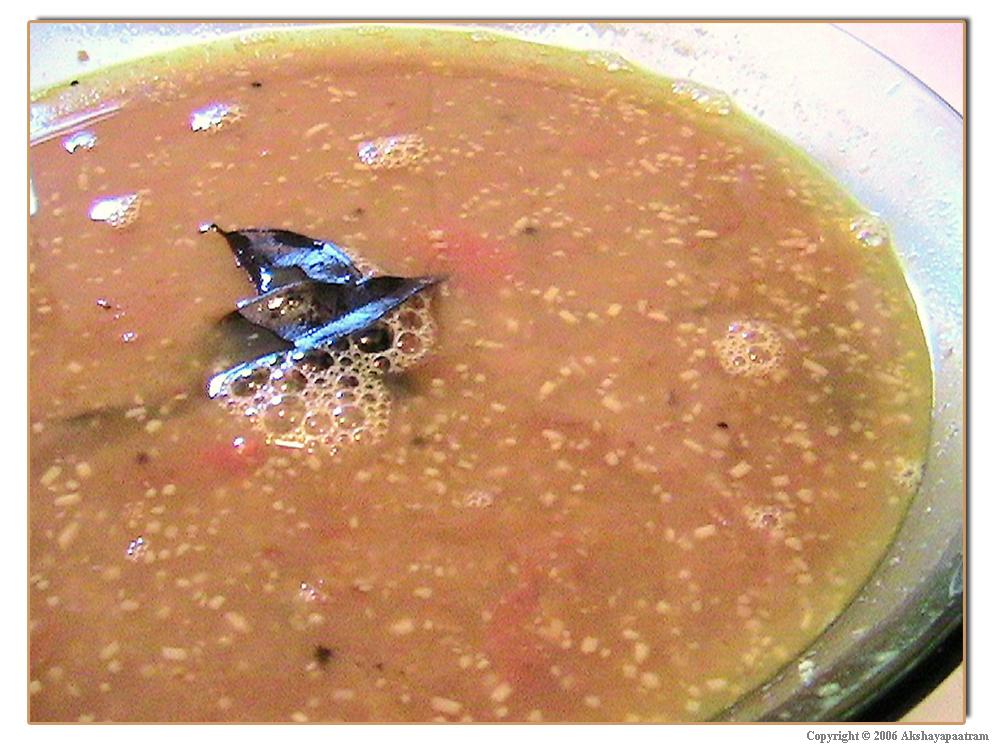
In most South Indian homes sambar is a dish that finds a place on the meal table almost every day. Its a simple recipe that provides vegetarians our daily dose of protein without much effort. Everyone knows that Madras is ever so popular for its Sambar but almost every region in the South has its own adaptation of the recipe and the variations are endless. Some like it spicy while others add a touch of jaggery to sweeten it, in our home sambar does not contain tomatoes as a rule while it could be common ingredient in other homes. Ground coconut, freshly ground vs pre-ground sambar powder, simple onions to a whole array vegetables - pick a variation and you have a completely different flavor profile to relish.


No matter what the version though, Toor dal/kandi pappu/pigeon peas is the lentil of choice for sambar and also the most commonly used dal in the South. During the busy week day mornings, my mom had her routine perfectly planned. My dad left for work at 7:50AM on the dot and breakfast had to be made and a complete lunch packed for him. My brother and I left at 8:30AM and she left home at 8:50AM. It was rush hour every morning and just like the famous Mumbai dabbawala's, our very own dabbawali never missed a beat either. Every move in the kitchen was streamlined in order to get wholesome meal prepared for us. The cooked toor dal served two purposes  - the thick mashed dal was added to the sambar while the dilute cooking liquid found its way into a warming rasam. My mom always adds a pinch of turmeric while cooking the dal in a pressure cooker but here it stains my stovetop and being the lazy one I avoid it altogether and add a few methi seeds and a pinch of asafoetida instead. A few drops of oil to the cooking water helps minimize foaming.


All you need for a comforting pot of sambar is a vegetable component which could be one or more of these - regular onions, pearl onions, carrots, bottlegourd(sorakaya), lady fingers (bhendi), brinjal, pumpkin, capsicum, potatoes, daikon radish (mullangi), drumstick (Munagakaya), chickpeas, fresh shelled broad beans, green peas. From the pantry you'll need tamarind, toor dal and some fragrant mom-made sambar powder! Thats it, you are just 30mins away from a bubbling pot of delicious sambar. Serve it simply with warm rice, dunk your idli's and vada's in it or serve it alongside hot upma or pongal and you have a wholesome meal to wrap your family around. I usually cook a double batch of toor dal and store it in the freezer so that on a busy week night dinner is really quick to put together.

Mom's Sambar Podi
Serving Size: ~2 cups
Prep Time: 20mins
Ingredients
  • 1 cup - Coriander seeds/Dhaniya
  • 1 Tbsp - Channa dal/Senaga pappu
  • 1 tsp - Fenugreek seeds/Menthulu
  • 1/2 tsp - Mustard seeds/Aavalu
  • 1" piece of dried turmeric root (optional)
  • Red chilli powder - 1/2 the amount of spice powder got from blending the above ingredients
Method
  1. Dry roast coriander seeds on medium heat until fragrant. You don't want to brown or darken their color, once they become fragrant transfer to a plate to cool.
  2. In the same pan add the channa dal and dry roast until it begins to change color, transfer to the plate and cool. Repeat the step with fenugreek seeds, mustard seeds and turmeric root, roasting each individually.
  3. Once all the ingredients have cooled down, transfer to a blender jar and finely powder.
  4. Transfer to a air-tight jar, add in the chilli powder and blend it in with a spoon. It's going to be a challenge, but avoid taking a close whiff of the powder or you'll end up in a sneezing marathon!
Notes: It you don't have dried turmeric root, skip turmeric all together and add a pinch of it when making sambar. The purpose of channa dal is to thicken your sambar.
- Don't let the fenugreek seeds turn dark or it'll make the powder bitter! Dried curry leaves can be added when preparing smaller batches.
-For my mom's rasam powder recipe check this post
Mullangi /Daikon Radish Sambar
Servings: 4-5
Prep time: 30mins
Cooking time: 30mins
Ingredients
  • 1 cup - Daikon radish, peeled and sliced into rounds
  • 3/4 cup - Toor dal, cooked and mashed
  • keylime sized ball of tamarind pulp or 1/2 Tbsp store-bought tamarind extract
  • 1.5 Tbsp - Sambar Powder
  • 1/4 tsp - Turmeric powder
  • 1 - Green chilli, slit lengthwise (optional)
  • Salt to taste
  • 2-2.5 cups water
Tadka/Seasoning
  • 1 tsp - Vegetable oil
  • 1/2 tsp - Mustard seeds
  • 4-5 - Curry leaves
  • pinch of asafoetida/hing 
  • Optional - 1/4 tsp Cumin seeds & a dried red chilli
  • Coriander leaves for garnish (optional)
Method:
  1. In a deep saucepan, add a cup of water, sliced daikon, slit green chilli. Cover the pot and cook on medium heat until the radish slices soften a bit. You can use a microwave for this step.
  2. In the meantime, place tamarind pulp in 1/4 cup water and nuke it for 1 min. This makes the extraction of the pulp easier. Alternatively, soak the pulp in 1/2 cup water for 30-40mins. Using your hands, squeeze out as much of the pulp as possible and reserve.
  3. Once the radish slices are soft, add the tamarind extract, sambar powder, turmeric powder, salt and cook uncovered for 10mins or until the raw smell of the tamarind is lost.
  4. Mash the dal well and add it along with a cup of water to the sambar pot. Taste test for salt and cook for 8-10 mins more until slight foam forms on the top and you can smell the comforting fragrance of the sambar. Adjust the consistency by adding more water as needed and taste test for salt.
  5. For the seasoning, heat oil in the tadka pan, add mustard seeds, cumin and once they begin to splutter carefully add curry leaves and a pinch of hing. Pour this over the sambar and keep covered until its time to serve. Garnish with coriander leaves right before serving.
Notes: If using vegetables like onions/brinjal/capsicum start by sauteing them in a Tsp of oil instead of cooking them in water in step 1. I like a really a tangy sambar and tend to use more tamarind extract, customize the recipe to suit your taste.
Served with warm rice, a tiny drop of ghee and crispy popadams/vadiyam on the side will send me to a very happy place. Those who fear the smell of raw daikon will have no worries enjoying this sambar. The soft daikon becomes mellow in flavor and are a delight in the sambar. You can sneak in almost any veggie into a sambar and make it taste good.
                                          Now you tell me how you make sambar at home ?

Monday, March 07, 2011

Fenugreek leaves/Menthi kura pappu

Toor dal in the cooker is like a meal made already for me. You could either add a few vegetables along with it or cook them separately, either ways you have a meal ready in about 30 mins. I usually make tomato/spinach/budamakaya (lemon cucumber) but when I can find fresh fenugreek leaves I use them to make this flavorful pappu. Fresh methi/menthi kura has a pungent flavor and when cooked its aromatic and addictive. I love it in all its forms -seeds, fresh & dried leaves.

The seeds are my best friend while making idli/dosa batter at home and also are a crucial part of pickles, the best condiment ever made. During summer, every morning my mom would force me to eat a cup of yogurt that had the seeds soaking in them overnight. This same mixture when applied to hair before washing acts a  great hair conditioner too.  Diabetics and nursing mothers are recommended a higher intake of these seeds due to their specific nutritive properties. The seeds are known to cool your body internally and even now when I see pimples peeping out, I immediately get some seeds soaking :) I always add a few seeds to the pressure cooker along with the toor dal too because otherwise I rarely use them in other recipes.

The dried leaves are that secret ingredient that adds the restaurant flavor that your north Indian curries made at home have been missing all this time. Crush a spoon of leaves in the palm of your hands and sprinkle it about 10mins before the gravy is done. The aroma that this adds and the flavor it brings will make you a want to hold the secret close to your heart when giving out recipes :) And the fresh leaves, aah, they are a delight to the taste buds. Unlike other greens, these guys have a robust flavor and are not shy to show it off. They are mildly bitter, a little sour and highly addictive :) My favorite way to use them is in aloo methi, thepla and true to my telugu roots, as pappu.

They do take some preparation when the mature plants are harvested. The stems get tough and leaves need to be picked off the stems when used for cooking. For tender plants though you can use the stems & leaves in the recipe. Fenugreek is really easy to grow at home, just soak the seeds in water for a few hours, allow them to drain and rest in a moist cheese cloth/tissue for 10-12hrs. You will see tiny sprouts begin to pop out, scatter them on loose soil and within a week you will see green stems peeking out. The plants in the photograph are < 3 weeks old. I am waiting to see how high they go before harvesting them. Not making any promises though :)
Menthi kura Pappu/Methi dal
Ingredients:

  • 1 cup - Toor dal, washed & drained
  • 1 cup, packed - Fenugreek leaves, washed
  • 1/2 cup - Onions, sliced
  • 1/2 cup - Tomatoes, chopped
  • 2-3 nos - Green chillies (adjust to taste)
  • a pinch of turmeric
  • 1 Tbsp - thick Tamarind pulp extract or 1/2 tsp store bought paste
  • 1/2 Tbsp - Oil
  • Salt to taste
  • Popu/flavor oil - 1 tsp ghee/oil, 1/2 tsp cumin & mustard seeds, a few curry leaves, 1 dried red chilli, sliced garlic or pinch of asafoetida/ inguva
Method:
  1. Pressure cook the toor dal with pinch of hing. In another pan, heat the oil and saute sliced onions and green chillies. When the onions soften and turn translucent add chopped tomatoes, turmeric and cook until they turn mushy.
  2. The washed, drained fenugreek leaves go in next, roughly chop them before adding if needed. Add a little salt and continue to cook until the leaves wilt and lose their rawness, ~ 6-8 mins.
  3. The dal should be done by now, once the pressure is released add the methi leaves mixture to the dal along with tamarind pulp and cook for another 10-15mins on low simmer. Taste test for salt and add more water if needed to get to a consistency that you like.
  4. Right before serving, add the popu by toasting the ingredients lightly in ghee and top it over the dal. Serve with hot rice or chapati.
Note:
You can cook all the ingredients together in the pressure cooker or, once the methi leaves are wilted in step 2 add the uncooked toor dal to the whole mixture, add required amount of water and continue cooking until done. Use a method thats convenient to you, each might have a very slight variation in taste.
I don't think I have to say how good pappu over a mound of warm rice tastes. Doing the popu in ghee at the very end will add a really great flavor and aroma to the pappu. The ghee mellows out all the high notes in the pappu and brings out the underlying creaminess of the dal. The methi is the real star of the dish though, its complex soury, bitter flavor is hard to explain and you will have to make this pappu to understand why so many of us love it.

Wednesday, December 01, 2010

Brussels Sprouts Kootu

Dear Foodies,

I hope all of you had a joyous holiday weekend. I made my first pie and stuffing this time! We weren't planning on it but I am glad I tried, they've been on my list of recipes to try for a very long time. I love pecan pie and V's fav is apple pie, from Julian! So I made a hybrid of the two and it turned out really good. But the 2 sticks of butter needed to make one pie crust will keep me from making it again for a very long time. But the stuffing muffins I made will surely be repeated to use up old bread. I used a few slices of leftover homemade jalepeno cheddar bread and added sauteed carrots, celery, fennel and onions that I spiced with chilli flakes and garlic. I used a few splashes of milk instead of stock to moisten the bread and it seemed to work perfectly.
Over the last few weeks Brussels sprouts seem to be taking center stage at all the grocery stores here. Still on the stalks, they look like Christmas ornaments and difficult to pass by without adding a few to my shopping cart. Brussels sprouts come from the mustard family and resemble mini cabbages but have a mild bitter taste. The easiest way I prepare them is roasting them in the oven with some oil, salt and pepper - near zero prepping. I also cook it like I would cabbage but without the peas in that recipe. This time I combined them with toor dal and made a wonderful kootu that goes really well with rice.

Thursday, June 25, 2009

Lemon cucumber dal - Budamakaya pappu

Dear foodies,

A bowl of pappu/dal, no matter how plainly made, is always enticing to the taste buds. It either has to do with the way our mind perceives this simple food, or the earthy flavor of cooked lentils or its both of them together, resonating comfort. I guess its also one of the first few solid foods that we get fed as child and right there it gets into the comfort food category. After a long trip away from home, or long day outside, a busy week or anything else that troubles us or disrupts are routine, gets us craving for some simple dal/pappu and rice. It can be creamy & luscious on its own with just a pinch of salt, some warm rice topped with ghee and a pickle or stir fry on the side. Or it could be partnered with different veggies like tomatoes, spinach, gongura (sorrel leaves), mango, dosakaya and many more variations that are just as good. Pappu is also a fail-safe dish in my opinion, any unfamiliar veggie gets tossed into a dal for starters, because you know nothing can taste bad with dal, right ?

A few weekends back when I had friends visiting we drove to the Pittsburgh temple, feasted on some yummy prasadham and stopped by an Indian store close by. I bought a bag of fresh peanuts in the pod to boil and snack on that evening and 3 plump budamakaya's (dosakaya/lemon cucumber). I made this pappu with one, that week, and again last night. While chopping it up y'day, I almost contemplated turning it into my fav budamakaya avakaya but the the idea of settling down to another delicious meal of pappu in the near future far outweighed the pickle plan. And the fact that I have a huge pack of fresh andhra avakaya (mango pickle), made with this season's mangoes, by my aunt did not have any influence, promise. :)

Budamakaya/Dosakaya Pappu - Lemon Cucumber Dal

Ingredients:
  • 1 nos - Lemon cucumber (dosakaya/budamakaya)
  • 1 1/2 cups - cooked Toor dal (along with a pinch of turmeric)
  • -- I usually have some cooked dal in the freezer
  • 3 nos - Green chillies, slit lengthwise (adjust to taste)
  • 1/4 cup - quartered & sliced Onions (I'm still in the vidalia onion craze)
  • 1/2 tsp - Mustard seeds
  • 1/2 tsp - Cumin seeds
  • 1 tsp - Channa dal
  • *1/4 tsp - Methi powder
  • 1/4 tsp - Turmeric
  • 1 tsp - finely minced fresh Ginger
  • 6-8 - Curry leaves
  • 2 tsp - Oil
  • Salt to taste
  • poppu/tadka - 1 tsp ghee, a pinch of mustard & cumin seeds, minced ginger, 1/2 slit green chilli & 2 roughly chopped curry leaves.
Method:
  1. Peel the outer thick skin of the cucumber, halve it and scoop out all the seeds. Make slices lengthwise and proceed to cube them. I got approximately a cup and a half of cubed cucumber from one whole.
  2. In a microwave safe bowl, toss the cuke, a pinch of turmeric, one minced green chilli, salt and water enough to cover the pieces and cook for 6mins.
  3. In the meantime, heat oil in a deep pan on medium heat. Add the mustard seeds, cumin and chana dal. Once they start to pop and the dal changes to a deep orange add roughly chopped curry leaves and a slit green chilli.
  4. As the curry leaves start to curl up, add the minced ginger. Saute for a few seconds and add the sliced onions. Sprinkle some salt on the onions to help soften them sooner. Cook for a 2-3 mins.
  5. Add the cooked cucumber along with the water and simmer together for a 3-4mins. Mash the dal well and add it to the rest of the ingredients. Check for salt and add some more water if the consistency is too thick. Cover and simmer on very low heat for 8-10mins till all the flavors combine.
  6. For the poppu/tadka: heat ghee, splutter a pinch of mustard and cumin seeds, add the chillies, ginger and curry leaves. Take off the heat when the leaves start to curl up and crispen. Pour it over the hot dal and serve immediately with hot rice, a dollop smidgen of ghee and fresh andhra avakaya.
Alternate method: If you don't have pre-cooked toor dal, you can cook all the ingredients together. Combine 3/4 cup toor dal, cubed cucumber, onions, salt, green chillies and ginger in a pressure cooker and cook till done. When the pressure is released, add the tadka and simmer for a while before serving.
I personally prefer cooking them separate though, which is what I did this time. The flavors seem to be better and I can also cook extra dal to reserve for later use. *You can also use beerakaya/ridgegourd instead of dosakaya.
Simmering the dal on low heat makes it utlra creamy and rich. I could just have bowlfuls of this without any other accompaniments...but well, hey, I couldn't possibly say no to rice and avakaya though :) Ginger is a main flavoring in this pappu and it pairs deliciously with budamakaya. Its usually not used much in other dals that I make, but with the mild cucumber for company it does wonders to the dal. The lemon cucumber, as the name suggests has a lemony, tart flavor but is still mild. The combination of lemon-ginger-chillies in this pappu is similar to my most favorite allam-nimmapandu chaaru and so this pappu is in the fav list too. The different spicy tones from the ginger & chillies and the refreshing lemony edge is addictive. The hot ghee in the tadka adds to the creamy richness of the dal and elevates it to a whole new level, a must have. And the pappu gets better as it rests for a few hours as the flavors meld into each other with time.

I found these weird twirls of green sitting in a basket atop all the other greens and herbs at the store last weekend. They looked funny and when I looked at the label, it said garlic scapes. The curious me, immediately grabbed a handful and headed to the check out counter. The guy manning the station looked at the curly stuff and then gave me a look that had 'weird' written all over it :)) Garlic scapes, are the tender stalks of the garlic plant and hold a mild flavor of garlic in them, not as pungent as the garlic pods, but surely with a distinct garlicky bite in them. Sort of like the texture of asparagus but with garlic flavor perhaps ? You can use them raw in salads, or add them to stir frys, dals, curry's or any other place you would like a mild garlic flavor. Now why am I telling you all this, you ask. Because when I made the pappu last night, I added some chopped garlic scapes along with the onions ... and it was fabulous. You could easily substitute it with sliced garlic though. Even I won't find them in the couple of weeks cos they are a spring time delicacy, and a slightly expensive one at that.

Tuesday, October 21, 2008

Potlakaya Kootu - snake gourd with toor dal

Dear foodies,

Last weekend I went to the Indian store and got home some fresh veggies, but I was so lazy to do the prep work on a weeknight and took the easier route. I had a frozen pack of snake gourd or potlakaya that I was saving to share with you a special recipe that my roomie used to make. But I realized if I kept saving it for that one day when I finally make the dish, the pack would have outlived its shelf life! So out came the pack and along with it a portion of cooked toor dal. This one is really a lifesaver, everytime I use the pressure cooker to make dal, I make extra of it and freeze it in single serving amounts in a ziploc bag. So the next 3-4 times I can just thaw the dal and have dal, sambar or rasam ready in half the time and have no cooker to clean either. I made a kootu with these two ingredients, one cos I did not want the usual tomato dal and two, I was out of tomatoes :)

This is most definitely not the authentic kootu recipe, my mom would have to give me that. As far as I remember she use's moong dal for kootu, no onions and the spices in it would be crushed cumin and pepper seeds along with coconut and yogurt cured chilies/ mor molaga/uppu mirapakaya. Here is my version, which is still delicious and very close to the original in taste.

Ingredients:
  • 11/2 cup - Toor dal, cooked (with a pinch on turmeric and a few methi seeds)
  • 1 cup - diced, Snake gourd (potlakaya)
  • 1 tsp - black peppercorns
  • 1 tsp - Cumin seeds/jeera
  • 2 Tbsp - grated coconut (I used frozen)
  • 1/2 tsp - mustard seeds
  • 1/4 cup - sliced Onions
  • 2 tsp - Oil
  • 2-3 nos - salted chillies/mor milagai, fried
  • Salt to taste
  • Coriander leaves/cilantro for garnish
Method:
  1. If you need to cook the dal, then get that going in the cooker, else place the frozen dal by the stove to thaw. Heat a pan with the oil and splutter the mustard seeds, add the onions and let them soften, about 3-4mins on medium heat. Microwave the snake gourd in the meanwhile and then add it to the pan.
  2. Saute for a minute and add 1/2 cup of water, salt, cover and cook for 5-6mins. Using a mortar and pestle crush the peppercorns and jeera together while the gourd softens up.
  3. Add the dal with another 1/2 cup of water, coconut, crushed powders and simmer for an additional 10-12 mins. During the last 2 mins, add the crushed, fried chillies and check for seasonings.
  4. Garnish with cilantro and serve warm with rice/chapatis or bread.
The coconut and pepper/jeera combo are the highlight in this dal. They combine so well with dal giving a smooth, subtle flavor that is very comforting. And the chillies add all the oomph it needs. The onions are here only because I had chopped them even before figuring out what I was going to cook, so skip them if you please ;) Instead of snake gourd you could use broad beans, potatoes, peas, carrots, cabbage, ridge gourd, and well let me know if I missed any :)

Its been 20 days already, phew!! 20 posts in 20 days!! Can you believe that, the calender on the left sidebar has me stumped, I've never seen it so pink before :) So go ahead and cheer me on, please! :P

Wednesday, June 04, 2008

Spinach dal/Palakura pappu

Dear foodies,


This is recipe has a double boost of toor dal, so beware! This was a quick quick (ya, that quick!) dish that I made for chapati's. So why was it that quick? (have I used up my quota for using the q-word in this para?) I had some frozen cooked toor dal in the freezer, I always make extra and store 1/2 cup measures of it in separate bags in the freezer. That really makes a dal/sambar easy the next time round, do try it is you don't already. And after the insect scares I got from my organic spinach/mint buys, I had a pack of frozen spinach waiting for me in the freezer too. So that meant I only had to thaw and temper the ingredients to have my dal ready. So now you know why it was quick na? :D The double booster of toor dal came from a handful of frozen tuvar lilva tossed into the boiling dal.

Ingredients:
  • 1 cup - Toor dal, cooked
  • 1 cup - Spinach, frozen (or fresh, chopped spinach 1 1/2 -2 cups)
  • handful of frozen tuvar lilva/lima beans/peas
  • 1/2 - medium sized onion, cubed
  • 2 small green chillies, slit lengthwise
  • 1/2 -1 tsp sambar powder adjusted to taste
  • Salt to taste
Seasoning/Tadka/popu:
  • 1 tsp - oil
  • 1 dried red chilli, broken
  • 1 clove garlic, sliced
  • 1/2 tsp mustard seeds and cumin
  • 3-4 curry leaves, torn to pieces
Method:
  • In a saucepan on medium heat, add 1/2 cup of water, frozen dal, spinach and let them heat through and thaw. Midway I also added the cubed onions. ( I was too lazy to heat another pan to saute the onions in. Since I let the dal boil and simmer later on, the onions were cooked well by the end of it, so save yourself the time and the effort)
  • Once the ingredients are thawed completely add the green chillies, sambar powder, frozen tuvar lilva and salt. Let the dal to come to a boil and simmer for a few minutes, add more water if its too thick.
  • For the tadka, heat the oil in a small pan, add the mustard and cumin seeds, as they crackle add the garlic. Allow it to brown a little and then add the curry leaves. After they crisp up, add the red chillies and turn off the heat. Add this to the dal and cover for a few minutes.

The browned garlic bits are very tasty and so are the tuvar lilva. They don't soften up totally like peas or lima beans and retain a slight bite which I really liked about them. The dal goes great with chapati's or rice. I had it with some dosa a few days later and found that it was a pretty decent combo. Here is another really good dal recipe, one of my favs.

Thursday, April 24, 2008

Comforting Kichadi

Dear Foodies,


I am back again, and this time I am armed with a brand new camera. Yayyy ! I am still learning and trying to find my way through the innumerable settings and buttons on the camera, so pardon the photography that I am going to force upon you guys for the next few weeks. Any tips and comments on composition, lighting, angles and everything else are more than welcome, infact I might make that compulsory ;)

The mention of the red chilli pickle in my previous post reminded me of kichadi and instantly I started craving for some warm kichadi. It was also going to be the best companion for kadhi which has sprung up on quite a few blogs this past two weeks. This time I made my usual kichadi without dressing it up like last time.


Ingredients:
  • 3/4 cup - Rice, I used Basmati
  • 3/4 cup - dal, I used 1/4th toor and 1/2 moong dal
  • 1 tsp - Shah jeera or Jeera/Cumin seeds
  • 2 nos - Garlic cloves, sliced or smashed
  • 1/2 cup - Onion, sliced lengthwise
  • 1/2" round of ginger
  • 4 nos - Laung/Clove
  • 1 nos - Bay leaf
  • 1 nos - Badi elaichi (or normal elaichi/cardamom)
  • 1" - Cinnamon stick
  • 2 nos - Green chillies, split thru the center
  • 1 tsp - turmeric
  • 2 tsp - Oil
  • Salt to taste
  • 2 1/2 cups - Water
Method:
  1. Soak the rice in water for about 20 mins. Heat oil in a pan (or pressure cooker) and add the jeera. Next add all the whole spices and heat them through for about a minute.
  2. The garlic and ginger go in next, after the garlic cooks a little (~1/2 -1 min) toss in the onions, green chillies and turmeric . I add a little salt to the onions so they release their moisture and soften faster.
  3. After the onions are cooked and turn translucent add the moong dal and saute for 2 mins on medium heat until they start turning a little golden and then add the rest of the dal and rice. You could also skip the 2 step process and add all the rice and dal together.
  4. Saute the mixture for 2mins until the moisture evaporates and the rice gets nicely coated with the oil. Transfer it to a rice cooker or microwave safe bowl and cook according to your tried and tested rice:water ratio and salt. I cooked it in the microwave for 14 mins, stirred it once and cooked for another 2 mins.
There seems to be nothing elaborate or rich about this dish but it sure is on the top of my 'comforting recipes' list. Its also because of the memories I've attached to Kichadi. My brother and I would play 'tent' in our home once in a while. We would pull together shelves and some how manage to drape bedsheets over them to form a tent right inside the house :D And then we had this nifty little torch light that had a fan on on side and the light on the opposite. We would fix that to the center of the tent and 'camp out' in our tent. We would also pile up pillows and bedding, books etc and make it a cozy corner. My mom would acknowledge this with kichadi and bring it to our tents :)) It sounds so funny and silly but those were golden days :)

For the Kadhi I followed Manisha's recipe but skipped the cloves in it. Thank you Manisha :)

Have a great weekend!

Friday, April 11, 2008

Ready for Adai ?

Dear Foodies,


The recipes are back again on this blog, Yayyyy !! So before my blog gets branded as another no-recipe food blog ;), lets get cooking, shall we ?

I really love dosa's and idli's, they are so easy to make and you can either go ahead with the whole side dishes charade or make do with some pickles and podi's in your pantry. Either way, they are a great breakfast, lunch or dinner. And our love for this is more than evident with the number of recipe variations that we get to see on the blogs.

Since I started cooking here, I've never tried making my own dosa batter from scratch. One main reason being I am scared to even try fermenting it, and another equally strong reason is I don't have a good blender :D So whenever I want to get the satisfaction of making dosa's from scratch I jump over to Vaishali's instant recipe, otherwise its the pesarattu and rava dosa that are my go-to dishes.

The other favorite of mine is the Adai....

Ingredients:
  • 1 cup - Rice
  • 1 cup - mixed dals -- more of chana dal & toor dal and a little moong/urad dal
  • 3 nos - dried Red chillies or to taste
  • A pinch of hing/asafoetida
  • A sprig of curry leaves
  • Salt to taste
  • Oil for cooking the dosa - approx 2 Tbsp
Optional additions: 1" inch - ginger piece, a cup of drumstick leaves, Cilantro

Method:
  1. Soak the rice, dals and red chillies in water for about 3 - 4 hrs. If I want it quicker I just microwave them for a few minutes to warm the water and reduce the soaking time to 1 -2 hrs.
  2. Grind the soaking ingredients with the curry leaves and any or all of the optional ingredients to a coarse paste. The coarseness is what gives the adai the crisp texture.
  3. Add salt to taste and the asafoetida and mix well. Heat a shallow, wide pan for making the dosa's and spread a little oil on the pan and get started with the adai's. (check here for pics )
  4. The adai should be a little thicker than the normal dosa. To make it cook uniformly and also to make them extra crispy, make 1 or 2 holes at the center of the adai and add a drop of oil, this gives it the signature adai look.
  5. Serve hot with red chilli pickle, kara podi (gunpowder ;) ), jaggery and yogurt to make a perfect meal. For some extra touch, my mom would also add a small dollop of home made butter on the warm adai, the white colored one...yummmm
In our house we were totally spoilt. There were always more than 2 accompaniments to any of these tiffin items. I would have this queue system to optimize the dosa/idli between all the side dishes :)) So if you ask me, all those items mentioned are compulsory not optional :D

You could also add some chopped onions while making the adai and sprinkle some kara podi and grated jaggery...(yup, you cannot have just one thing)


and roll them up for the to-go person :)

I also tried my hand at my mom's Sponge dosa recipe. Since my blender did not give me a very smooth paste, I had trouble getting it to ferment well, and ya its the ~hand~ too :( So I added a tiny pinch of baking soda create the sponge effect :))


And most of you would have figured it out, this one is for Srivalli's dosa mela.

Saturday, May 19, 2007

Dal Mussallam -A recipe to live for !!

Dear Foodies,


This is one of the best dals I have ever made or eaten & also one of the simplest recipes to cook. For most Indians, dal and rice with a little drop of ghee is their comfort food. And a dal like this is just the perfect one for me. It has a very creamy, smooth texture to it and takes the everyday dal a notch higher. I found this recipe in the cookbook a few months back. I intended to include a pic of the book and a little about the author and the book itself. But I have stayed away from blogging long enough to have erased any memory of the book, even its name ! I tried looking it up on the library's website but with no success :-( Will let you guys know the moment I get a chance to visit the place myself.

I tried the search one more time and found the book !! Here it is Secrets of an Indian kitchen. The author, Mridula Baljekar, is UK based and you can read more about her on her website here. The contents of this book are categorized by way of cooking methods like: Baghar/seasoning; Bhuna/stir frying; Dum/steaming; Korma/braising. She explains each method carefully before going into the actual recipes. The recipes have very detailed instructions, with an intro to each. She has also included helpful substitutions and tips where ever needed.There are also 'things to watch out for' kind of notes here and there, the utensils/equipment required etc., which I think is very thoughtful. This is all I can remember about the book, I just browsed through it a couple of times and found a very good number of recipes interesting. I dint get around to trying many though, and had to return the book early. Do look for this book in your local library !
I have made this one about 3-4 times, the second time being the very next day :-), Yes, thats how good it is. Onto the recipe without anymore delay. This is more from my memory, and I am not sure if it is exactly how the book states it, but is definitely very closeeeee.... :D The ingredients in the tadka do look simple and might seem too little, but don't add anything more and enjoy the simplicity of the dish.

Ingredients:
Pressure cook:
  • 1 nos - small Onion, chopped and sauted in a little butter
  • 1 1/2 cups - Toor dal/Masoor dal, washed thoroughly
  • 1 tsp - Turmeric powder
  • 1 tsp - Chilli powder
-----------------------------
  • 1 nos - Tomato, medium sized, chopped - if using canned diced tomatoes, I recommend you add them to the dal above and pressure cook since they are not as tender and take a longer time to cook
  • 1 tsp - Garam masala
  • 1 Tbsp - Yogurt - THE most important ingredient
  • Salt to taste
----------------------------
For the seasoning/tadka:
  • 1/2 Tbsp - Ghee/butter - stay away from oil for this one, I promise you will not regret :-)
  • 1 1/2 tsp - Jeera/Cumin seeds
  • 2 small Green chillies, finely chopped - or as per taste
  • 2 big cloves of Garlic, finely chopped
Method:
  1. Saute the onions in a little butter in the pressure pan and then add dal, 3.5 cups water and the rest of the ingredients to it and cook. Masoor dal was recommended in the book.
  2. Once the steam from the pressure cooker dies down, open it carefully and set it on medium heat on the stove top. Add in the tomatoes and cook for a few minutes.
  3. Next add your favorite garam masala and the yogurt and stir them in. Turn down the heat a bit right before you add the yogurt, just to be careful of avoiding it from breaking up. The yoghurt makes the dal creamy and rich, which I think is the best part of it.
  4. While the dal is simmering, get the tadka ready. Heat some butter/ghee in a small pan, once it is hot, add the cumin seeds, green chilles and garlic. Just as the garlic starts to brown add it to the dal, turn off the heat on it and close with a lid.
  5. The author's tip : Open the lid and mix in the tadka right before serving or at the table. The whiff of the aroma when you open the lid will bring out all the hunger in you and satisfy you even before you dig into it :) And she is so true in saying so.
  6. Garnish with coriander leaves if you can hold yourself even after the smell hits you :P. Serve with hot rice or chapatis.
This has become my favorite dal recipe, and to think it is so simple to make ! After this recipe I have become a fan of the magical transformation a spoon of yogurt can lend to a dish, be it dal or a North Indian gravy dish. If you don't already do this, try it out today and turn your dish into a rich, creamy one without the need for any fattening heavy cream. Yogurt also tends to bring all the spices in the dish together giving you a smooth overall effect instead of a sharp individual feel. And not to forget, that it can also take care of that accidental, unintentional extra spoon of red chilli powder or garam masala in the dish ;-)

~~ I have been away for a long time, and have no exact reason for it. I thank all of you who continued to visit here and also sent me emails, left comments inquiring if all was well. Thank You !! It was really wonderful to read your messages. A very special thank you to Kanchana, Nabeela, Jaya, Hema, Sharmi :) I am doing well & just got caught up with things. I am done with my courses at school and on the look out for jobs right now. I got just bogged down by the slow results and lost the mood for blogging. I have been cooking and blog-surfing all this while, but just could not get myself to post. But now, I think it does'nt make any sense by not posting as the photos are just piling up and I am starting to forget the recipes already !! :D

Sunday, December 17, 2006

Majjiga Pulusu/Mor Kuzhambu

Dear Foodies,


After a very long time I am posting a recipe from my mom. She sent me a few recipes with pictures quiet a few months back, but I never got around to putting it up. She had made Aratipoola pappu podi ( also known as patoli or usili) and majjiga pulusu for lunch at home. I was going to put in both of them in this post but realized there was a lot more I wanted to write about the plantain flowers, so thats again going to be a post some time hopefully in the near future !! For today I'll be serving some cool and extremely comforting pulusu made with buttermilk.

This one is called 'majjiga(buttermilk) pulusu' in Telugu and 'Mor Kozhambu' in Tamil. It is similar to the North Indian 'Kadi'. You can add veggies like okra, brinjal, white pumpkin or bottle gourd or some spinach or collard greens to it, or when your fridge is empty you can add lil fried besan bajji's or steamed chana dal-toor dal dumplings. I generally end up making this when we have loads of buttermilk nearing its expiry date !! hehe

Ingredients:
  • 3 cups - Buttermilk
  • 1/2 cup - Coconut (freshly grated/dessicated)
  • 2 tsp - Chana dal
  • 1 tsp - Toor dal
  • 2 tsp - Rice
  • 2-3 nos - Green chillies/dry red ones if thats all you have !
  • 1 tsp - Cumin seeds
  • Pinch of turmeric (optional)
  • Salt to taste.
  • 1 tsp -Coconut oil
  • 1 tsp - Mustard seeds
  • A sprig of curry leaves and coriander leaves for garnish.
Procedure:
  1. Soak the chana dal, toor dal and rice in some warm water for 15-20 mins. I generally toss in the dessicated coconut, cumin seeds and the chillies in the water too, just to make it easier to grind in my very delicate blender.
  2. Heat some oil in a pan and saute the veggies and reserve or blanch some spinach or collard greens.
  3. Grind the soaked ingredients to a coarse paste by adding sufficient water.
  4. Add this to the buttermilk along with some salt and the veggies or greens or the steamed dal dumplings/besan bajjis and heat the whole thing on medium heat.
  5. Don't let it boil, but just until it raises up and then turn off the heat.
  6. Season it by spluttering some mustard seeds, and curry leaves in coconut oil.
Sit back and enjoy every morsel of rice had along with this extremely delightful and soothing dish !! Pair it with this for a absolutely wonderful combo and you can use the same steamed dal as dumplings for the pulusu :-)

Steamed, coarsely pulsed chana dal, toor dal and red chilli dumplings. recipe??


Monday, November 13, 2006

Mysore Chaaru

Lentils cooked in Tamarind & freshly ground spices
~~~~~~~~~~~~~~~~~~~~~~~~~~~~~~~~~~~~~~~~~~~~
Dear Foodies,

Mysore chaaru or Mysore rasam is one of my favourites, and is perfect for a cold winter night. I'll be posting the recipe in the evening, hopefully in time for your dinner :-)
~~~~~~~~~~~~~~~~~~~
Mysore Chaaru
~~~~~~~~~~~~~~~~~~~

This rasam was a regular at our home and more often than not it would feature on the Saturday menu. Why you ask ? Well, we usually had tiffins for dinner on Saturday's, and this rasam can be a standalone meal with just papads or vadiyum to accompany it. A simple aloo fry or any veggie, steam cooked and then stir fried along with some tadka, go very well with this dish. ( I used radish this time) And so it was ideal for an afternoon lunch with no leftovers for dinner and no worries for mummy too :-) .

This rasam has a wonderful medley of spices with pepper being the main source of 'heat' in the recipe, and this gives the warmth in the body when savored on a cold night. You can add a dried red chilli to the spice mix if needed. The rasam is also slightly thicker than the usual rasam but thinner than sambar. The freshly ground spices give a very distinct flavor to the the rasam, making the meal satisfying to the soul and the body. Do try it out and enjoy the winter night :-)

Ingredients:
  • 1 cup - Toor dal, boiled and mashed lightly
  • 1 key lime sized ball - Tamarind, soaked in water and pulp extracted
  • 2 nos - Tomatoes, slit into four portions.
for spice powder:
  • 1 tsp - Cumin seeds
  • 1/2 tsp - Coriander seeds
  • 1 tsp - Pepper
  • 1 Tbsp - Toor dal
  • 1/2 Tbsp - Channa dal
  • 1 1/2 tsp - Coconut flakes or fresh coconut
for popu/tadka:
  • 1 tsp - Ghee
  • 1 tsp - Cumin seeds
  • 4-5 nos - Curry leaves
  • Coriander leaves for garnish
Method:
  1. Heat some oil, roughly about 1 tbsp, in a wide pan and toast the ingredients under the spice powder one after the other. The coconut can be added after the stove is switched off, as it needs very little heat else, it might burn. Allow them to cool.
  2. In a vessel, pour in the tamarind extract, 2 cups of water, salt and the slit tomatoes. Allow it to boil.
  3. In the meantime, powder the spices, add some of the tamarind extract to aid in grinding if required.
  4. Add this spice mixture to the boiling tamarind water and continue to simmer.
  5. Once the raw smell is gone add in the mashed dal and again bring it to a boil. Add another cup or half of water if needed. I generally take out the tomato pieces for a moment and mash them throughly at this stage.
  6. Once the dal gets harmonized with the spices and tamarind turn off the heat.
  7. Add the popu done in ghee and serve hot with rice and vadiyam/veggies.

Friday, October 06, 2006

Pongal - Sweetened Rice and Lentils

Dear Foodies,

Here is the first recipe among the goodies I made for Dasara.

My entry to Luv2Cook's JFI-Ghee event

Pongal, is a rice and dal mix that is cooked in jaggery and made rich with generous amounts of ghee and dry fruits, raisins and cashews roasted in ghee in particular. Coming to think of it, the word dry fruit in most South Indian sweets, more often than not implies, raisins and cashews. Very rarely have I seen other nuts used. And interestingly, though there are soo many festivals celebrated in India each one of them has a particular 'traditional festival-menu' attached to it. This was probably deviced to treasure the hundreds of recipes that our forefathers came up with. In our house its not just the sweets and savories but the daily lunch/dinner menu is also a custom-made one for that particular festival !!

Well back to Pongal, I think its one of the easiest sweets you can dish out, and it is relatively lesser time-consuming and does not call for much of your attention either. Leave the dal and rice to cook and take care of the other things in kitchen till then. Get back to it after sometime, add some jaggery-dissolved water, forget about it yet again and let it simmer, finally add a few dollops of ghee and dry fruits. And Voila,Its done !! You have a comforting and rich dish ready to serve.

Home-made ghee would be the best for this recipe or for any Indian sweet, for that matter, the better the quality of the ghee the more mellowed the flavor and the aroma is just enticing. This month's Jihva event hosted by Luv2Cook is all set to showcase the pivotal role that ghee plays in our cuisine.

This time I made a few variations to my usual recipe. I cooked the rice and dal in half milk - half water mix instead of just water. And I also forgot the amount of dal to add and went ahead and tossed in dal equal to nearly half the amount of rice. And when the final taste was different from what I had planned for, I called Customer Support, my Mom :-) She pointed out to me that we have to use very little dal. She said, the reason a little dal is added to the rice is, plain rice is never offered to the Gods, so we add a lil moong dal and/or channa dal to it. Now you ask might want to ask why not just plain rice...?? According to tradition, plain rice is offered to God only when mourning a death in the family, and so for every other occasion a little dal, even if it is just a few grains, is added to the rice while cooking it and offered as naivedyam. Even for everyday naivedyam, my mother adds a few grains of toor dal to the rice.


Ingredients:
  • 1 1/2 cup - Rice
  • 1/4 cup or lesser - Moong dal
  • 1/4 cup or lesser - Channa dal
  • 4 cups - water (or your usual ratio for 2 cups rice )
    OR
    2 1/2 cups - water & 2 cups - whole milk
  • 3 cups - Jaggery (or equivalent amount of sugar)
  • 3-4 Tbsp - Ghee
  • A handful of raisins and cashews/almonds
  • 3-4 nos - Cardamom pods/Elaichi, powdered (optional)
for garnishing:
  • chopped fresh coconut pieces
  • ghee
  • honey
Procedure:
  1. Pressure cook the dal and rice with the water or a water+ milk mix.
  2. In a separate pan toss in the jaggery with a cup of water and allow it to melt. It does not have to get a syrupy consistency, we only want the jaggery to dissolve in the water. This might take just 5-6 mins and so you can do this after you have switched off the rice cooker and are waiting the steam-pressure to ease.
  3. Add the jaggery water and powdered cardamoms to the cooked rice-dal mixture, stir well and simmer for 8-10mins. Check ferequently to avoid the bottom layers from burning. If using sugar you dont have to make a syrup, you can directly add the sugar with some water to the rice-dal mixture while its hot and stir on low heat.
  4. Roast the dry fruits in 1 Tbsp of ghee and add it to the rice along with the rest of the ghee. Mix well, add a little more water if required. Keep in mind that the pongal thickens when it cools, so turn off when it is still holding some water.
  5. Serve hot or cold. While serving you can garnish it with chopped pieces of fresh coconut and/or a drop of ghee. My father likes to drizzle a spoon of honey on his !! YUMMM :-)
Notes:
  • I did not have fresh coconut, so I roasted some dessicated coconut flakes in warm ghee and added it to the pongal.
  • If you use just water to make the pongal, the final dish will have a deep yellowish brown color from the jaggery. Since I added milk, the color has lighened.
This bowl of Pongal is now off to Luv2Cook's medley of JFI -Ghee dishes :-)

Blogging tips