I took these photographs yesterday, and was lazy to upload them immediately, and today morning I realized that the deadline had passed ! But I am not going to spare you guys cos of that :D, so here you go...
Whats your pick ?


Ingredients:Thats it, you have a versatile dish in your hands now. Mix the chutney with hot plain rice along with a tiny dollop of ghee or drizzle of oil, spread it on your bread for a flavorful sandwich, add to a cup of thick yoghurt and use as a dip for chapathi's & dosa or even veggies/chips , use it in chat recipes like bhel puri, sev puri, pani puri...ohh, the list is endless.Method:
- a bunch of pudina/mint - approx 2 loose cups
- 2 tsp - Oil
- 1 tsp - Urad dal
- 1 tsp - Channa dal
- 2 nos - dry, Red chillies (adjust to taste)
- tamarind, the size of a 25cent/50paise coin or ~1/2 tsp if using extract
- Salt to taste
- 1-2 Tbsp - water
- Wash the mint leaves and drain them on a kitchen towel. Heat a pan with oil, once hot add the dals. ( I use the broken urad dal, and so add it a little after the channa dal, else it burns)
- Once the dals turn a little golden, reduce the heat and add the tamarind and red chillies. Once the chillies change color, transfer all the ingredients to the grinder.
- To the same pan (with oil) add the mint leaves and saute for 2-3mins till they wilt. Transfer to the blender and grind to a coarse texture adding water as required. Don't overdo the water or the chutney will not hold together. (I have a tiny food processor, so I first used my spice grinder to coarsely powder the dals and then transfered them to the food processor with the pudina). Add salt to taste.

 Finding a good veggie burger is soo tough, isn't it? Not many places even have them on their menu. During my Masters, I survived on the Wendy's veggie burger, which had a slice of cheese, onions, cucumber and couple of pickles inside a bun, for well more than three months. And it still remains a favorite because of lack of better options around. Except for Burger King I haven't seen a fast food place serve veggie burgers and well, and I haven't seen it at the restaurants I have been too either. The only way you can take a easy route to having a veggie burger is by grabbing a pack of frozen Boca burger patties or veggie patties at the grocery stores and making your own burger at home. I've made my own burger patties at home inspired by the masala burger patty from Trader Joe's and the delectable recipes from Bee & Jai, but I don't make and stock them that often.
 There, you are all set to have a scrumptious veggie burger now. You will surely love this one! It has soo many veggies with none of the usual onion/lettuce/tomato combo. The kaiser rolls are sturdy enough to hold all of them, and the spiciness in the black bean burger is enough to balance the rest of the veggies. I was cooking with yellow squash for the first time and I really like it. It has a very different flavor from zucchini (well, I thought it was just a yellow colored zucchini until then!!) with a slight peppery or may be jalapeño'ish twist to it (!). The grilled veggies are extremely good for munching on their own too, so definitely make extras. They are surely my most favorite part of the burger!
 Has it happened to you? A recipe or dish just gets stuck on your mind and the only way you can get it out of your system is to cook it once...and until then it haunts you every time you are in the kithcen or watching TV or out shopping. Yes ?? Thank God! then I am not alone :D It was ravioli for me. My favorite Italian restaurant serves a mean mushroom ravioli, and everyone who has eaten it swears by it. I haven't tried it because a certain kind of mushroom (don't know which) triggers a very bad stomach ache for me and so I avoid anything that has mushrooms when eating out. I guess that was when the ravioli madness started...
 You can top them with marinara or cream sauce but if you have made the ravioli yourself, I would recommend a very basic topping so you get to taste the pasta by itself and not drown it in other sauces. You will also have extra stuffing from this recipe, hang on for more ways of using them :) If using fresh spinach, chop it finely and saute it in a little butter or oil. you could also add some finely chopped shallots to it if you like.
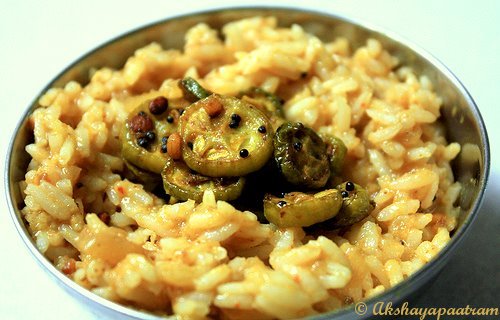
 How many of you like dondakaya/tindora/ivy gourd ? I know I love it! But this vegetable has such a tarnished reputation and powerful lobbyists who saw to it that it never showed up at any home with school going kids, atleast in Andhra they succeeded. It was told to induce dullness as opposed to the ladysfinger which could turn you into a Math wiz (!!). So every mother would sneak in bhendakaya/ladysfinger as often as she probably could and relegate the dondakaya to an occasional day far far away from any Math exam. The poor guy could not fight all that bad energy :( But now that I am done with all schooling, I am going to enjoy this dish in peace :) (and hey! its actually not bad for you)
 My mom usually made the stir-fry/vepudu with it and thats my favorite way of eating it too. She would cut them into discs and not length-wise. I think the shape you cut it does change the texture of the dish. The discs cook faster, evenly and are crisp and tender at the same time. When cut length wise I think the chances of thicker pieces are more and I just hate biting into an undercooked piece, okay, I am just biased towards the discs (Mom's always rule) :) and so the frozen tindora is not something that I like. Whenever I get access to fresh dondakaya this is how I cook it,

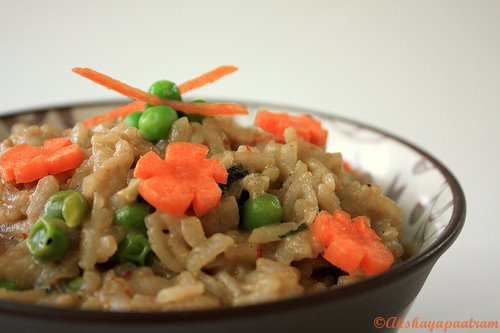
 Having seen many many recipes for risotto on blogs and the high praise that is showered on this dish, I just had to try it out. So off I went to the store one fine day and picked up some Arborio rice...and so the story ended! Yes, that box of rice was sitting on my pantry shelf for more than 2 months without complaints!! Last week I finally decided it was time to bring it out, I was out of fresh vegetables and the Risi e Bisi photo flashed past my mind.
 Now, you cannot possibly take a photo without garnishing the dish first, right? So I brought out some baby carrots, chopped them up into little flower-like shapes, decorated the risotto with it and took the pictures. Later when I took a bite of the risotto with the carrots, I loved the crunch...so... I hurriedly diced up some more carrots and added it to the risotto. I had it with some yogurt for dinner, Absolutely lovely! Now that the box has been opened, I am surely going to try out other flavors soon.