Sunday, March 01, 2015

My DIY Spice Blend


Dear Foodies,


Yet again its been a silent few months here though I most certainly promised myself it wouldn't be that way. I've still been cooking a lot for myself and friends every chance I get. Oddly enough, pausing to take photos started to takeaway from the food experience...that's my story for being lazy. I even have a hard drive full of unused photos to find their way here anyway. It's not that I got busier but time that I previously spent updating my blog now got used reading many others. My bookmark list just keeps growing and keeping track of my to-try recipe list is seemingly impossible. I find new blogs almost every other day filled with photographs fit for a magazine spread. We don't even have to go into cookbooks authored by bloggers that are on my library list. I must admit it did put a damper on my spirit, questioning the need for continuing my little space here. I'm keen on shaking that feeling off though and will continue to journal my favorites here leaving the eye candy as an added bonus, if it happens.


Last year I spent quite a few weeks at by brother's place during summer and that meant having plenty of occasions to grill outdoors on their patio. I experimented with cooking on the grill -  pizza's, summer corn, grilled paneer and veggies and of course all with had an Indian twist. I was also trying out different spice blends and ended up with one that was a clear winner and versatile enough to go with paneer, veggies or even meat.

Every few weeks I make a batch of cumin, coriander and fennel powders just enough to half fill those bottles you see in the photos. I put together this spice blend as well and have them ready to go.This lasts me a month or so and ensures that they remain fragrant and potent for when I need them.


When I don't want an overly spiced dish but just something to accentuate the flavor of fresh ingredients this is the mix I go to. Its a mild blend with lots of citrusy, fresh notes from coriander and fennel. Roasted cumin and turmeric add a earthy note while the chaat masala brings more brightness and twang. This is blend that works for me and I encourage you to play with it and make it your own too. If you don't like much heat replace some of the red chilli powder with mild paprika or even smoked paprika. On occasion I've added freshly ground cardamom for added citrusy notes when using it in long simmered gravy curries. Use some powdered cloves or allspice for a warm, spicy kick without direct chili heat.

Roasted vegetables
I find this masala goes really well for roasting veggies. Here I have a rainbow of peppers, carrots, summer squash, red onions and Brussels sprouts. You could use cauliflower, eggplant, sweet potatoes, butternut squash, pumpkin, fennel and pretty much any other hearty vegetable of your choice. Coat evenly with your spice blend, some oil and roast in a 450F pre-heated oven for 25-30 mins tossing 1-2 twice in between. I used about 2 tsp of masala for the tray of veggies shown.

On an episode of Jamie at home he insists on using vinegar or citrus juice when roasting veggies and I became an instant believer after the first time I tried it. It immediately brightens the flavor and gives them a finger licking quality. I add a splash of vinegar in the last 5-10 mins of cooking instead of at the beginning though. I'll share more about my technique and how I re-purpose these roasted veggies to make multiple meals in a separate blog post.

Masala roti
Combine 1 tsp of spice blend with 2 tsp of oil and lightly brush the mixture over roti or tortillas before toasting them on medium-low heat for an instant flavor boost! Go ahead and use your spiced up roti/tortilla to make wraps and tacos and sit back to receive compliments :) Apply the same technique when using up tortillas to make homemade chips. I do this with plain appalams for a chatpata version that can then be used as chips or topped up with a mix of chopped onions-tomatoes-cilantro turning it into masala papad.

I don't have photos but can tell you it makes for a great marinade when combined with thick plain yogurt. If you have time go a step further and cook down pureed onions, ginger+garlic paste and our spice blend with a bit of oil until caramelized. Add some sour yogurt to this mix and cook a little further to end up with a thick paste that when cooled can coat the paneer/veg cubes. A few hours of this marination does wonders to the final flavor. Mildly sweet from the caramelized onions, slightly sour from the yogurt and combined with the mix of spices will make it an instant party favorite.

Go ahead, make your own spice blend and come back to share your recipe with me :)

Wednesday, August 06, 2014

Farmstand Summer Salad

Dear Foodies,


The recipe for this salad was nothing more than putting together ingredients in my market tote. Everything was perfectly fresh, picked right that morning at their peak flavor. There was not much I needed to do to enjoy a good lunch. My neighborhood market is a short 10 min walk from my apartment. It opened the week I moved to the area 3 years ago and though it has changed locations a few times, its still within a 5mi radius. A couple of farms have become market regulars and bring in their fresh produce, likely picked that morning. Even if I don't need groceries for the week I stop by to see whats in season.

Buying veggies and fruit at the market is not necessarily cheaper than at the stores but freshness cannot be beat. More importantly it makes you relearn seasonality charts which are easy to forget when you can buy out of season produce shipped in from around the world at grocery stores. And a bonus if you still need one is finding lesser known varieties of fruits, vegetables and greens that never make it to large scale grocery stores. The lemon basil I used in this salad is a perfect example of that. I'd never heard of it before but the minute I walked up to the table the fragrance from the herb was hard to ignore. It's less peppery than regular basil with a big punch of lemony, floral notes and is perfect in raw preparations.


One other bonus I'm embarrassed to admit is getting my evening snack fix from samples laid out - candy-like tomatoes, crunchy pea pods and sugar snap peas, variety of citrus segments, berries even some fresh pita chips and dip! The difference in taste between produce at the market and grocery store is unbelievable. With a strong CSA subscription and a regular flow of people stopping by to pick up weekly groceries, farmers can confidently harvest produce without any pressures of having to transport them many miles away. Its a perfect win-win for both parties while also establishing a sense of community. I'm usually scrambling to get there by closing time but when I do have a few minutes to chat I get tips on how to cook unfamiliar ingredients, gardening tips to salvage my brown thumb or an extra handful of beans or a sprig of herbs thrown in.

I had some cooked chickpeas on hand and decided to include it to make the salad substantial. I lightly roasted them in a cast iron pan along with a little oil to get them crisp around the edges. I roasted shucked corn as well to add in the salad. If you had an outdoor grill/grill pan you could grill them first instead. I happen to love charred corn flavor but you could skip this entire step and use them raw...choose your favorite method.

I made a simple lemon+olive oil dressing perked up with red pepper flakes and tangy chaat masala for an Indian twist. Any combination of fresh herbs you like should work here. I used cilantro that I always have in my fridge and potent lemon basil from the market. This salad tastes better when made ahead and set aside for at least 30 mins up to a couple of hours. I stored leftovers in the fridge and had it for lunch next day and it tasted really good.

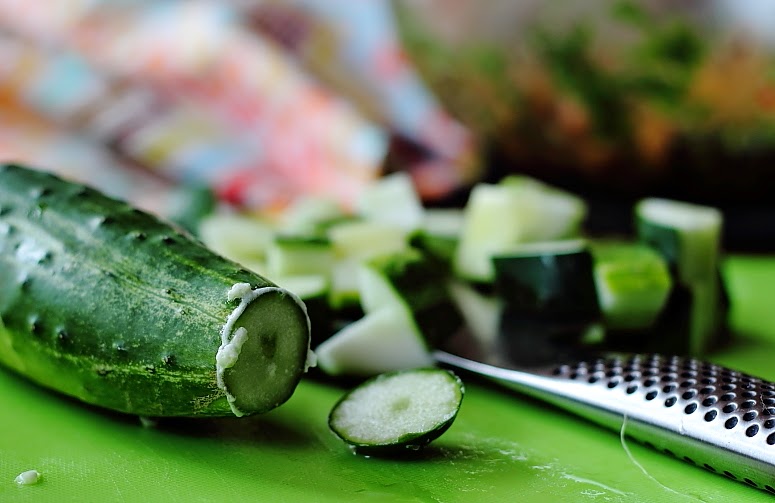
 I used a couple of crunchy Kirby cucumbers in this salad and made a quick pickle out of the rest using this recipe. Some cukes tend to have a bitter edge to them and I use my Dad's trick when prepping to get around it. I begin by slicing off both tips, take one end bit and rub it against the opposite end in a circular motion about 4-5 rounds. Repeat using second end bit on the other end. You'll see a slight foam form around the edges and its supposed to be the bitterness getting drawn out. Wash it under running water and slice as needed. I never cared to research if science backs this up but also don't recollect ending up with a bitter cuke after using this method.
Farmstand Summer Salad
Prep Time - 15 mins
Cook Time - 20 mins
Servings - 2-3 (main) 4-5 (side)
Ingredients:

  • 12-15 - Heirloom cherry/grape tomatoes or 2-3 regular sized
  • 1 ear of Corn, shucked
  • 2 - Kirby cucumber (~approx 1 cup diced)
  • 1 cup - Chickpeas, cooked
  • 6-8 - mini Mozzarella balls, halved
  • 1/3 cup - chopped herbs. I used Cilantro and Lemon Basil
  • 1 Tbsp - Oil
  • 1/4 tsp - Turmeric (optional)
  • Dressing - 2 Tbsp Lemon juice, 2 Tbsp - extra virgin Olive oil, 1/2 tsp Salt, 1/4 tsp Black pepper, 1/4 tsp Red pepper flakes (optional), 1/2 tsp Chaat masala
Method:
  1. Heat a cast iron pan to medium heat with a tablespoon of oil. Add cooked, drained chickpeas, 1/8 tsp turmeric and roast for 8-10 minutes tossing every few minutes till lightly browned on all sides. 
  2. Whisk together all dressing ingredients in a bowl big enough to hold finished salad. Once chickpeas are done add to bowl and toss gently. 
  3. Add shucked corn to the pan with remaining 1/8 tsp turmeric. Saute for 6-8 mins until lightly charred and add to dressing bowl. 
  4. Allow to cool slightly before adding diced tomatoes, cucumber, herbs and cheese. Toss all ingredients together and adjust seasonings to taste. Cover and set aside for at least 30 mins at room temperature or in the fridge if serving cold. 
  5. Serve with freshly shucked corn as a garnish and toasted bread on the side.
Note: I used turmeric for color and it can be left out if you don't have it. Add chunks of lightly toasted cubed bread for a take on panzanella. Diced avocado, jicama and red onion would also work well here. This salad travels well and can be made ahead for a picnic or potluck.

This salad hits different notes on the flavor and texture palate and only gets better as it marinates in the dressing and fresh tomato juices. Though chaat masala may seem out of place in a salad it pairs perfectly with tomatoes and corn and of course its best friend cilantro and lemon. I made this three times in 10 days and will continue to make it as long as I can get my hand on these fresh ingredients. Its become my favorite lunch to pack and I'm going to miss it once summer is out!

Tuesday, July 22, 2014

Summer Breakfast Parfait

Dear Foodies,

I will forever be envious of those who can pause in the morning to make themselves a good breakfast before getting started with their day. I wake up with just enough time to get ready for work and rush out the door. Taking a few extra minutes to sit down and enjoy breakfast even if its just a bowl of cereal or a banana makes me antsy. But skipping it entirely isn't an option either so I've found my way around it. I can't stick to one recipe for more than a few weeks but variety is good, right ? I've circled through many breakfast ideas and tricks over the years and will share some of them so I remember when the lull moves in.

We are in the cusp of berry season and stone fruit season leaving us with an abundance of choice. Strawberries, raspberries, blackberries, blueberries, peaches, nectarines, plums, apricots, plumcots, lychees, jackfruit and the list goes on. Each of them proudly vibrant, plump and bursting with sweet juices making it impossible to not be greedy. But its a good problem to have on hand, pretty much wash-eat-repeat I'd say.

My breakfast during the last few weeks has been yogurt + fruit. I wanted to make it a little more fancy and played with the idea of a parfait. I was out of granola so I made a quick stove top version that was ready in 10 mins. I toasted rolled oats, flax seeds and slivered almonds in some brown butter on really low heat for 8-10 mins until they were evenly browned. I finished it off with some local honey and sea salt to balance out flavors. While this was happening I scooped a few spoonfuls of homemade yogurt into a strainer to get rid of excess moisture. I also pitted plump rainier cherries, roughly chopped strawberries and tossed them with a few blueberries and another drizzle of honey and a squeeze of floral lemon juice.

All three components will be ready in just over 10 mins. All that's left to do is layer them as you please. If you are feeling fancy pick a tall glass or jar like I did, be meticulous in your layering of yogurt followed by fruit and granola. Step out onto your patio and enjoy breakfast under the pleasant warmth of the early morning sun. Or Scene 2 - dump them together with no real rhythm into a container with a tight lid and rush out the door to where ever your day takes you. Either way, you'll enjoy the beauty of summer fruit and look forward to another mornings' breakfast.
Summer Breakfast Parfait
Prep time: 15 mins
Servings: 2
Ingredients

Quick Granola
  • 3/4 cup - Rolled Oats
  • 1/2 cup - slivered Almonds
  • 1-2 Tbsp - roasted Coconut chips
  • a pat of butter
  • 1 Tbsp - Flax seeds
  • 2 tsp - Honey
  • a pinch of sea salt
  • 1/2 cup - Yogurt, strained
  • 1 cup - Cherries, Strawberries and blueberries
  • 1 tsp - Lemon juice
  • 1 tsp - Honey
Method:
  1. Place a wide, shallow plan on low-medium heat and spread slivered almond into an even layer. Toast them gently, tossing every few minutes until evenly browned and set aside. Next add butter and heat until it begins to brown slightly. Add oats and flax seeds and toast on low heat till they are turn a nice golden color. Remove from heat, add almonds and while still warm drizzle honey and salt. If adding dry fruits like raisins or cranberries, do so at this stage.
  2. While nuts and oats are toasting, spoon yogurt into a strainer (placed over a bowl to catch whey) and place in the refrigerator. 
  3. Pit and roughly chop cherries and strawberries into a bowl, add blueberries, lemon juice and honey. You may need more or less honey based on how tart or sweet the berries are.  Place these in the refrigerator as well until ready to assemble.
  4. In a tall glass or jar spoon a layer of berries followed by yogurt and granola. Repeat as many layers as the glass will hold and end with a drizzle of sweet juices from the macerating berries.

The combinations are endless with this one - add vanilla bean seeds or extract to the macerating fruits or lemon/orange zest or cinnamon/cardamom or a tiny bit of grated nutmeg. Use whatever combination of fruit you have on hand, I cannot think of a bad one. Jackfruit + honey + pistachios is divine, papaya + candied pineapple + toasted coconut chips, for tropical bliss. Add other nuts to the instant granola - pecans, walnuts, brazil nuts, pistachios, pine nuts, raisins or dried fruit like cranberries, raisins, pineapple or cherries. You know, no rules. And of course, you can flavor the yogurt too or make a compote from some of the fresh fruit, but when simple, weekday-morning-doable can be this good, I'll stick to minimal work.

Friday, July 18, 2014

Weekend Craft Corner || eReader Fabric Sleeve

Hi Foodies,

It's hard to open this space and start talking writing again. This post has been in the drafts for 2 weeks now and there isn't a recipe even :) This is another quick weekend sewing project for a beginner. I went overboard with my fabric purchase a few months back. Luckily I bought just 1/2 yard pieces since the only project I had in mind needed very little fabric. I'm bad when it comes to making a choice and a craft store is mental overload in those terms! There were too many good prints to pass up and photo below is the selection after I'd pared it down :)

The first project to come out of this loot was a sleeve for my Kindle. It was my Christmas gift from my brother and sil and I had to protect it from the obstacle course in my handbag. There are many many patterns and inspiring covers out there. I came across a few that used sturdy folder covers sandwiched between fabric that double as a stand when folded. It's a nifty idea and next on my list to try, for now though I stuck to a simple sleeve pattern.


You'll need:
  • 2 pieces of coordinating fabric. I probably used 1/4 of each 1/2 yard piece, approximately a little more than twice the area of your device with seam allowance.
  • 1 piece fusible fleece - I used this one
  • Matching thread and a contrasting button for the loop closure
No process photos for this one since I was experimenting without a pattern. I started with fabric that was twice the length of the Kindle and sewed along the sides. I then ironed on the fusible fleece to the outer fabric, wrong side out. To sew the two pieces together I used the same method used in this bag (finishing the tote step). I used a small piece of the inner fabric to make a loop closure and finished it with a cute button. An elastic hair tie would work too.


Though I did not plan it that way I love how the star pattern lines up in the front and the fleece underneath gives a nice textured look to the fabric. The fusible fleece is soft and provides enough cushion without making the sleeve bulky so I'll definitely be using it in other projects.

Any project suggestions for my remaining fabric selection ? :)

Saturday, March 01, 2014

Cauliflower Cutlets/Patties with Roasted Red Pepper Dip

Dear Foodies,

We are finally seeing some much needed rains here this weekend. Its been overcast for the last few days with frequent bursts of rain and glimpses of pretty rainbows throughout the day. Since we hardly see a string of dull days like this its a nice time to indulge in snacks and piping hot chai/coffee and get cozy at home. I love cutlets/tikkis/patties whatever you choose to call them and this was a perfect time to try a few variations.

Cauliflower is a summer/fall season vegetable yet I still spot them in a myriad colors (white, yellow, purple!) and their adventurous friends - romanesco and brocoflower at the farmers market. Tempted by the offerings I pick a different color each time and experiment with new ways of preparing them instead of my go to method. I used a whole head of yellow cauliflower in this recipe but you could just as well swap any other veggie you have on hand. I made a variation of this by coarsely blending soaked garbanzo beans, coriander stalks and leaves, green chillies and added mashed boiled potatoes along with the spices mentioned in the recipe below.

The best part of a cutlet is the crispy crust and semolina/rava is the magic ingredient here. I find using chickpea flour or bread crumbs as a binder makes cutlets dense and takes away from the flavor of the veggies. Both those are overcome by using rava and as a bonus it gives them the awesome crispy texture we crave. If you are impatient like me in the kitchen this also lets you get away with out waiting for all the water to drain from steaming veggies.

No matter how good your veggie mix its a sturdy iron skillet that seals the deal in getting the texture right and using less oil. If you don't have one then get one right away! A heavy bottom stainless steel skillet might also work here but not a non-stick pan since you'll be left with sloppy cutlets. Not good.

I used my skillet to char mini red peppers under the broiler for the pepper dip. This dip is based on the recipe for Spanish romesco sauce but with the number of substitutions I made I think I would offend folks if I called it that! :) The recipe calls for stale bread and I only had stale pita bread on hand so use whatever you have available.

Cauliflower Cutlets/Patties
Prep time: 15-20 mins
Cook time: 20 mins
Servings: makes 6-8  4"patties
Ingredients:
  • 1 head of Cauliflower
  • 2 Scallions, chopped
  • 1 tsp - Chaat masala
  • 1/2 tsp - Coriander and Cumin powder, each
  • 1 tsp - Red chilli powder (adjust to taste)
  • 1/8 tsp - Turmeric powder
  • 2 Tbsp - Rava/Semolina
  • 2 Tbsp - toasted Pita bread crumbs, powdered (or add more rava) 
  • 2 tsp - Lemon juice
  • 2 Tbsp - Cilantro, chopped
  • 3-4 - Mint leaves, chopped
  • Salt to taste
  • 4-5 Tbsp - Oil
Method:
  1. Separate cauliflower into florets and reserve tender stems. Steam in microwave with a little sprinkle of water or plunge in salted, boiling water for a few minutes. With either method keep in mind that stems take a few minutes longer to cook than florets.
  2. Place skillet on medium-low heat. Drain florets and add to a mixing bowl with all other ingredients. Using a potato masher or fork gently combine and form a coarse mix. Taste test and add seasonings. 
  3. Form rough 4" round patties about 1/2" thick and place on skillet. Drizzle drops of oil around each patty and cook 2-3 mins on each side until golden brown. Serve immediately as is with a dip and as a burger patty.
Note: I made a variation of this by coarsely blending soaked garbanzo beans, coriander stalks and leaves, green chillies and mashed boiled potatoes along with similar spices. Quick pickled red onions made by soaking sliced onions in red wine vinegar for 10-15 mins makes for a zesty accompaniment.
Roasted Red Pepper Dip
Prep time: 10 mins
Cook time: 40 mins
Servings: makes ~2 cups
Ingredients:
  • 5 mini colored peppers or 2 regular red bell peppers
  • 2 - Plum tomatoes 
  • 5 - Garlic cloves
  • 10-12 - Almonds and Walnuts, each 
  • 2 - small Pita breads, quartered (or use 2 bread slices )
  • 1-2 Tbsp - Red wine vinegar
  • 2 tsp - Lemon juice
  • 1/2 tsp - Coriander & Fennel powder
  • 1/2 tsp - Paprika
  • 3-4 Tbsp - Extra virgin olive oil
  • Salt to taste
Method:
  1. Preheat oven to 350 deg. Wrap garlic cloves (with skin) in foil along with a drizzle of olive oil and roast for 20 mins. Spread nuts and pita bread on a baking sheet and roast for about 10 mins.
  2. Next place halved peppers and tomatoes cut side down on a skillet, spray cooking oil and broil for 15-20 mins until outer skin appears blistered. You can do this on a open grill as well. Place roasted peppers and tomatoes in a bowl and cover tightly with cling film or lid to loosen skins. Allow to rest for a few minutes before peeling.
  3. Once cooled, squeeze roasted garlic cloves from skin into a blender jar. Add roasted peppers, tomatoes, nuts, pita bread, all other ingredients and half of the red wine vinegar and olive oil. Process until smooth adding more red wine or olive oil to taste and until you reach desired consistency.
Note: This is a great dip to use with chips, crudites, as a spread in burgers or sandwiches.
This was a wonderful combination of flavors that I turned into a light lunch on a bed of arugula greens. It'd work great as late afternoon snack or sandwiched between well toasted bread slices. Cauliflower is a hearty vegetable that takes very well to spices. I used scallions for their mild flavor and fresh herbs add a bright flavor. The combination of toasted nuts, chaat masala, fennel powder and lemon juice adds a nice savory tang to these cutlets. This aspect is only enhanced by the zesty red pepper dip. I could practically have the dip all by itself. I end up finding excuses to use it in all manner of preparations whenever I make it.

Monday, February 10, 2014

Quinoa & Lentil Pilaf

Dear Foodies,

 
I've been bringing home big bunches of menthikura (fenugreek leaves) from my trip for Indian groceries. During the off season I get a miserly 20-25 sprigs for 2$ and now its thrice that quantity for the same price. So now I'm trying to find new recipes since the usual suspects -  andhra style pappu, aloo methi fry, methi malai paneer have been covered. For lunch last week I was looking to use quinoa instead of rice and decided to make this puloa/pilaf.

To cook quinoa by first toasting the seeds in a dry pan. This adds a nice nuttiness and also keeps them from turning into a mush if cooked a few extra minutes. As they toast the seeds begin to pop which is my cue to take them off the heat and rinse them under cold water. Based on the batch/brand that you buy you may have to rinse the seeds multiple times to get rid of the bitter outer coating. Once water runs clear I add water in the ratio of 1:1.5 and bring it to a boil. Add salt and whole spices or spice powders at this stage for extra flavor. Then set to lowest heat setting, cover and cook for 15-20 mins until all the of water is absorbed.

I had a huge bunch of methi leaves, freshly shucked peas and carrots on hand. Quinoa is a good vegetarian source of protein but I bumped it up with whole green lentils. Cook them in twice the amount of water, bring to a boil, add salt/spices and simmer for 10-15 mins until al dente i.e., they still retain a bite. Technically you could cook the lentils along with quinoa but they tend to discolor the cooking liquid and I did not want that. I was cooking a bigger batch of lentils to use later anyway so it worked out well.
Quinoa - Lentil Pilaf
Prep time - 10 mins
Cook time - 15-20 mins
Serves - 2
Ingredients:
  • 1 cup - Quinoa, cooked; (see note above for cooking method)
  • 1/2 cup - Brown/Green lentils, cooked
  • 1 cup - Fenugreek/methi/menthikura leaves, packed
  • 1/2 cup - Carrots, grated
  • 1/4 cup - Green peas
  • 1/2 tsp - Coriander powder
  • 1/4 tsp - Mustard seeds, Cumin seeds
  • 4-5 - Curry leaves
  • 2 - Green chilies, slit lengthwise
  • 1/2 tsp - Urad dal (Ivory lentils)
  • 1/8 tsp - Turmeric powder
  • 1 Tbsp - Peanuts and Cashews
  • 2 Tbsp - Olive Oil
  • salt to taste
Method:
  1. Cook quinoa and lentils separately. (See my notes above for cooking method)
  2. Heat oil in a wide saute pan on medium heat, add mustard and cumin seeds. Once the seeds begin to splutter add urad dal, peanuts and cashews and toast until reddish brown. Add turmeric, curry leaves, green chillies, methi leaves and saute for a few minutes. Grated carrots and peas go in next along with coriander powder and salt. Cover and cook the vegetables for 6-7 mins on medium-to-low heat.
  3. Add quinoa and lentils, mix thoroughly and cover again for 8-10 mins on the lowest heat setting to allow flavors to meld.

I enjoy the crunchy texture of quinoa and its perfect here with the mild bitterness from the fenugreek leaves, sweet peas, earthy lentils and occasional cashews and peanuts. I used a mandoline and not a grater to shred carrots which helps them retain their shape and stay separate when cooked. I served this with a dollop of labneh with pomegranate seeds. Yogurt would have been my go-to choice if I hadn't run out of it. Pomegranate seeds added a bit of tartness which is nice here, or a wedge of lime would do the trick too. And if you think I've focused more on the fabric than the dish itself in these photos then your not totally wrong :D I fell in love with the print and had to buy it though I have no clue what I'll use it for!

Sunday, February 09, 2014

Weekend Craft Corner || Farmers Market Tote

Dear Foodies,
I've had my sewing machine for about 3 years now and once every couple of months I bring it out of its box. I usually pick projects that get done in day, the instant gratification from these keeps me searching from more. Since I'm always on the look out for quick and easy things to make I thought I'll share my ideas here every week/month and ask for yours in return.
 I re-use paper bags from stores like Whole Foods, TJ's and Sprouts but having a pretty cloth bag to flaunt is even better. I made 3 of these totes last summer - one for my dad, my sister-in-law and myself. My dad's probably the most frequent user in our family since he has used cloth bags for our grocery shopping for as long as I can remember. So he dictated the design aspects - a sturdy bag that would stay vertical when set on its base, making it convenient to place it on the floor when filling it up with fresh produce; pockets on the outside to hold spare change, keys or a cell phone; a lining inside that's easy to clean; and a way to seal the bag, keeping its contents from spilling out.
After much searching for a style we all liked I ended up at this tutorial  - Summer Madras Tote pattern. Its a really well put together tutorial with detailed photos and instructions for a beginner like me. I used fabrics that I picked up at a yard sale last year. Outer fabric is a sturdy cotton and floral fabric for the inner lining is much lighter in weight. The inner lining can be pulled out for cleaning as its held together only at the top. I used a contrast color for the handles and to line pockets. To add loft and sturdiness I sandwiched a layer fusible interfacing between the two layers and also sowed a few velcro strips across the opening to close the bag.

What are you crafting ?

Friday, January 31, 2014

Another Harvest

Dear Foodies,


A very Happy New Year to you all! I hope you have had a great start to the year. This year seems to be a run to get done though, its already the last day of the month now! So before I break any unmade(!) resolutions  lets get going shall we. I've told you before about Harvest Crops and the great work that they do. Last year they partnered with another fabulous cause - Meals for Hunger. Together they strive to save fruit in the community from goin waste and provide for those that cannot afford it.

This past weekend about 40+ volunteers gathered to pick avocados and other citrus fruit. It was a gorgeous day to be out and we were all raring to go by 9 am on a Sunday morning. We were headed to a house with an abundance of avocados for the season. The very first time I saw an avocado tree was when driving through southern California on a road trip. I mistook them for mango trees and hurriedly stopped by the farm hoping to get hold of fresh mangoes. From them on, we drove past miles and miles of avocado farms. California is said to produce 90% of the local harvest with Southern California contributing close to 60% of that.
So its no surprise that the house we visited had 60+ trees for us to pick. There are more than 50 varieties of avocados grown here with the most popular ones being Hass and Fuerte found in the farmers markets here. I couldn't tell what variety of avocados were grown but there were definitely a few different kinds - some close to 7-8 in and others barely reaching 4 in.  I couldn't spot a single avocado for the first 10-15 mins, going from tree to tree as they blend really well with the dark green leaves and are well hidden under their shade. The blooms are a pale greenish yellow with a grassy fragrance. While moving from one tree to the other we kept thinking there wasn't much fruit to pick, but when it came time for the final harvest photo we had plenty.
Happy Birthday Ma! I know I don't say this enough - Love you! >:D<
We also picked a few pounds of oranges, limes, lemons, grape fruit and kumquats. One of the many reasons I love volunteering for this organization is getting to know the variety for fruit that grows around here. The blooms above are from an almond tree and the mild fragrance from them was truly a breath of fresh air.

Tuesday, August 27, 2013

Simple meals | Soba Noodle Salad

Dear Foodies,


The last few weeks our grocery shopping has been an exercise in self control, well, when is it not actually. On each trip, my dad and I come back with a couple of bags of fruit.  To get all our groceries we invariably end up going to a couple of stores in the area. And its extremely tough not getting tempted by the variety of fruits found in each. We seem to be at a perfect point in the season where summer berries are sharing the space with wonderful fall stone fruit. Mangoes and lychee's from the Asian market, plump raspberries, blueberries, strawberries, blackberries and melon at the neighborhood Sprouts and ripe peaches, nectarines, plums, plouts, plumcots(!) from Tarder Joe's. It's come to point where my mother has had to intervene and place a ban on fruit buying (huh!).  But we still sneak some in cos there's just too much fruit to pass up and not enough time to enjoy all of it. psst...mango is still the winner :)

We are also eating our way through the amazing produce from our trip to Suzie's farm a few weekends back. The ripe tomatoes went into a traditional South Indian pachadi/pickle (recipe soon), enchilada sauce (this too!), green tomato chutney, rasam, sandwiches, salads and many more. In fact, no matter what we cooked in the last few weeks, tomatoes and peppers found a way in. A few beets, eggplants and peppers are still hanging around and I want to give this gorgeous looking pickled slaw a try soon. But in the mean time, here is a super simple summer noodle salad. It does not need much cooking and is great at room temperature or cold. I start with soba noodles that are made from buckwheat and have a nutty flavor and a slight chewiness when cooked. Did I mention it barely takes 4 mins to cook them ? In the time it takes for the water to come to boil and cook the noodles, the veggies and dressing can be prepared. Quick, simple and flavorful.

Soba Noodle Bowl
Prep time: 20 mins
Cook time: 10 mins
Ingredients:-
  • 2 bundles (3.1oz each) - Soba noodles
  • 1/2 cup - Onions, sliced
  • 1/2 - Red pepper, sliced lengthwise
  • 10-15 - Snow peas, vein removed and sliced in half
  • 1 Tbsp - Toasted sesame oil
Dressing:-
  • 2 tsp - Toasted Sesame oil
  • 11/2 Tbsp - Tamari sauce or Soy sauce
  • 2 Tbsp - Tahini or Peanut butter or Almond butter
  • 1 Tbsp - Lime juice or Rice Vinegar
  • 1-inch knob of fresh Ginger, finely grated
  • 1 tsp - Sriracha hot sauce or 1/2 tsp - Red chilli flakes (adjust to taste)
  • 1 tsp - Honey
  • 1/3 -1/2 cup - Noodle cooking liquid 
Garnishes:-
  • 2 stalks - Scallions, green and white parts sliced
  • 1/2 cup - Cilantro, coarsely chopped 
  • 2 tsp - Sesame seeds
Method:-
  1. Bring water to boil in a pot deep enough to hold the noodles.
  2. In a large mixing bowl, add all dressing ingredients and whisk to combine. If the tahini or nut butters are clumpy and the choice of pots allows it - carefully place the bowl on the pot of water to gently heat and loosen the dressing. Otherwise, microwave for 15-20 seconds. Taste test and adjust quantities to suit your taste. I tend to add more lime juice and ginger.
  3. Blanch snow peas in the near boiling water for just a minute or two. Fish them out and add to the dressing bowl. Next add the noodles and cook to package instructions.
  4. Heat sesame oil in a shallow, wide pan on medium-high heat. Add onions and peppers to it and stir fry until slightly tender yet crunchy. Transfer to the dressing bowl. Toast sesame seeds in the same pan until lightly browned. They'll start jumping out of the pan at this point anyway :) Reserve for the final garnish.
  5. Once the noodles are ready, reserve 1/2 cup of water and drain the rest. Rinse noodles under cold running water and add to the dressing + veggies bowl. Toss gently to coat the noodles with the dressing, adding noodle cooking water as needed.
  6. Garnish with chopped scallions, cilantro and toasted sesame seeds.
Note: Swap in other veggies but make sure pick a few that are crunchy. You can also add crushed, roasted peanuts for garnish. I've made this recipe with all three choices - tahini, peanut and almond butter and they all tasted good.

This has become one the recipes I go to when a quick, flavor packed meal is needed. Its fresh, colorful and has lots of textures and flavors that will keep you going back for more. I've become a huge fan of the ginger-soy combo after I made this for the first time and have used it in this salad recipe too. The ingredients in the dressing are things that I have begun to stock in my pantry and I always have a few packets of soba & udon noodles from the Asian market. With the addition of a few veggies its a quick lunch or dinner in the making. Since its good at room temperature or cold, and sans garlic, its a great lunch box dish as well.

Blogging tips