Tuesday, August 27, 2013

Simple meals | Soba Noodle Salad

Dear Foodies,


The last few weeks our grocery shopping has been an exercise in self control, well, when is it not actually. On each trip, my dad and I come back with a couple of bags of fruit.  To get all our groceries we invariably end up going to a couple of stores in the area. And its extremely tough not getting tempted by the variety of fruits found in each. We seem to be at a perfect point in the season where summer berries are sharing the space with wonderful fall stone fruit. Mangoes and lychee's from the Asian market, plump raspberries, blueberries, strawberries, blackberries and melon at the neighborhood Sprouts and ripe peaches, nectarines, plums, plouts, plumcots(!) from Tarder Joe's. It's come to point where my mother has had to intervene and place a ban on fruit buying (huh!).  But we still sneak some in cos there's just too much fruit to pass up and not enough time to enjoy all of it. psst...mango is still the winner :)

We are also eating our way through the amazing produce from our trip to Suzie's farm a few weekends back. The ripe tomatoes went into a traditional South Indian pachadi/pickle (recipe soon), enchilada sauce (this too!), green tomato chutney, rasam, sandwiches, salads and many more. In fact, no matter what we cooked in the last few weeks, tomatoes and peppers found a way in. A few beets, eggplants and peppers are still hanging around and I want to give this gorgeous looking pickled slaw a try soon. But in the mean time, here is a super simple summer noodle salad. It does not need much cooking and is great at room temperature or cold. I start with soba noodles that are made from buckwheat and have a nutty flavor and a slight chewiness when cooked. Did I mention it barely takes 4 mins to cook them ? In the time it takes for the water to come to boil and cook the noodles, the veggies and dressing can be prepared. Quick, simple and flavorful.

Soba Noodle Bowl
Prep time: 20 mins
Cook time: 10 mins
Ingredients:-
  • 2 bundles (3.1oz each) - Soba noodles
  • 1/2 cup - Onions, sliced
  • 1/2 - Red pepper, sliced lengthwise
  • 10-15 - Snow peas, vein removed and sliced in half
  • 1 Tbsp - Toasted sesame oil
Dressing:-
  • 2 tsp - Toasted Sesame oil
  • 11/2 Tbsp - Tamari sauce or Soy sauce
  • 2 Tbsp - Tahini or Peanut butter or Almond butter
  • 1 Tbsp - Lime juice or Rice Vinegar
  • 1-inch knob of fresh Ginger, finely grated
  • 1 tsp - Sriracha hot sauce or 1/2 tsp - Red chilli flakes (adjust to taste)
  • 1 tsp - Honey
  • 1/3 -1/2 cup - Noodle cooking liquid 
Garnishes:-
  • 2 stalks - Scallions, green and white parts sliced
  • 1/2 cup - Cilantro, coarsely chopped 
  • 2 tsp - Sesame seeds
Method:-
  1. Bring water to boil in a pot deep enough to hold the noodles.
  2. In a large mixing bowl, add all dressing ingredients and whisk to combine. If the tahini or nut butters are clumpy and the choice of pots allows it - carefully place the bowl on the pot of water to gently heat and loosen the dressing. Otherwise, microwave for 15-20 seconds. Taste test and adjust quantities to suit your taste. I tend to add more lime juice and ginger.
  3. Blanch snow peas in the near boiling water for just a minute or two. Fish them out and add to the dressing bowl. Next add the noodles and cook to package instructions.
  4. Heat sesame oil in a shallow, wide pan on medium-high heat. Add onions and peppers to it and stir fry until slightly tender yet crunchy. Transfer to the dressing bowl. Toast sesame seeds in the same pan until lightly browned. They'll start jumping out of the pan at this point anyway :) Reserve for the final garnish.
  5. Once the noodles are ready, reserve 1/2 cup of water and drain the rest. Rinse noodles under cold running water and add to the dressing + veggies bowl. Toss gently to coat the noodles with the dressing, adding noodle cooking water as needed.
  6. Garnish with chopped scallions, cilantro and toasted sesame seeds.
Note: Swap in other veggies but make sure pick a few that are crunchy. You can also add crushed, roasted peanuts for garnish. I've made this recipe with all three choices - tahini, peanut and almond butter and they all tasted good.

This has become one the recipes I go to when a quick, flavor packed meal is needed. Its fresh, colorful and has lots of textures and flavors that will keep you going back for more. I've become a huge fan of the ginger-soy combo after I made this for the first time and have used it in this salad recipe too. The ingredients in the dressing are things that I have begun to stock in my pantry and I always have a few packets of soba & udon noodles from the Asian market. With the addition of a few veggies its a quick lunch or dinner in the making. Since its good at room temperature or cold, and sans garlic, its a great lunch box dish as well.

Monday, August 19, 2013

Tostadas with Guacamole, Red Cabbage slaw & fresh Corn

Dear Foodies,


Have you been to a horse race ? We were there a few weekends back and surprisingly had a good time. I don't think I would go back there every weekend, but it was a good one time thing to do. I don't gamble much, I could just as well through some cash out the window and it'd be the same. But that said, we wagered a couple of dollars on a few races that day. My dad found a few websites that offered free tips for each race. Some could not have been more off the mark, the one they picked to come 1st came 6th in a 8 horse race...ughh. We ended up with happy coincidences on some picks though - I whopping $3.60 on a $2 wager...hehe. They have 8 races each evening, one every 30 mins, that gives a rookie just enough time to figure out which horse to pick and place your wager. We had a nice time and enjoyed the first 4-5 races of the day. It took us awhile to figure out what was going on but we soon caught on and knew what win, show, place stood for and even the special quinella, trifecta and exacta meant. We tried a few combinations on each race until we were tired of losing and got out. By the 7th race we were done and left before the final race for the day.  Every summer my evening drive home is disrupted by this event - the amount of traffic is crazy, taking me twice as long to get home. Now I know whats its all about but still don't get where the money comes from! Even in the midst of a recession, $458 million was wagered at the race track last year, that is nearly $13 million a day!


Instead of corn tortillas I picked up these tostadas at the store. I had never tasted them before and was intrigued by the idea of having a crunchy chip as the vessel for toppings. Part of the reason I like corn tortillas is probably the smaller size. The fillings tend to be what I like the most about taco's. I'd rather have less tortilla and more filling and these tostadas are even better because of the crunch they bring. They are light and still surprisingly sturdy enough, allowing you to pile on the toppings.

A tostada is a fried tortilla that can be loaded with goodies. Its like an open faced taco with a crunchy shell giving you more room for filings which are essentially the best part. When you need a light lunch or snack to get you through a busy summer day a tostada is your answer. With the bounty of avocado in the markets here I make guacamole very often and with a few other ingredients I can have a fun meal ready in 15 - 20 mins. If you don't find pre-made tostada's in your local stores you can lightly fry store bought corn tortilla's as shown here. But finding ready made ones would be ideal in making this a quick meal to put together.


This dish has a few of my current favorites - guacamole and red cabbage slaw. Its perfect for picnics or do ahead scenarios as you can make and store all the components ahead of time. And more importantly, it looks stunning on the plate ;-) It could also be a great addition to a 'taco party' menu. I keep the guacamole simple with lots of cilantro and lime juice. A hint of cumin and diced jalapeno round up the spices for me.

Summer Veggie Tostadas
Prep time: 20 mins
Ingredients
  • Tostadas
  • 1 cup - Guacamole (recipe below)
  • 1 cup - Mexican cabbage and Jicama slaw
  • 2 - Corn on the cob, roasted (oven/grill) or microwaved whole in the husk
  • 3 - Spring onions - greens only
  • Feta cheese
  • Hot sauce (optional)
Guacamole
  • 2 - Avocados
  • 1-2 - Limes
  • 1/4 cup - Cilantro, roughly chopped
  • 1/2 tsp - Jalapeno/Serrano, minced (adjust to taste)
  • 2 Tbsp - Onions, finely diced (optional)
  • 1/4 tsp - roasted, Cumin powder
  • Salt to taste
Method:
  1. Roast or char grill corn or microwave in the husk for 3-4 mins as I did for this recipe. Once cool to handle, slice off the kernels with a sharp knife. 
  2. For the guacamole, combine onions (if using), minced chilies, cumin powder, salt and half the lime juice in a bowl. Using the back of your spoon apply gentle pressure to crush them together. This helps to draw out the juices. Add peeled and roughly diced or scooped out avocado to the mix and toss together. I sometimes go for a smooth texture and use a fork to mash everything together or when I want a more chunky guac, I add diced avocado and fold it into the other ingredients. Add more lime juice to taste, I prefer more of it.
  3. To assemble, apply a generous smear of guacamole on the tostada, top it with a few spoons of the cabbage slaw. Add as much of the corn and cheese and complete it with a sprinkle of spring onion greens and a few drops of hot sauce(optional)

This was a super nice spin on ingredients used in these tacos. The tostada's are surprisingly sturdy and did not fall apart in my hand and neither did they turn into a soggy mess. The sharp hint of lime in the guacamole and the slaw brighten up the dish and the fresh summer corn is a burst of sweetness. I had some mild feta on hand and it turned out to be a nice addition to the tostada. This is more of a technique or idea and could be used as a perfect vehicle for all the fresh produce in summer and fall.

What's your current summer favorite go-to meal ?

Wednesday, August 14, 2013

Homemade | Rhinestone / Kundan Rangoli

Dear Foodies,

Padmam - Lotus muggu
I'm going to take a detour from cooking on today as I can no longer keep this new craft that my mom and I (...mainly her :) ) have been churning out from all you guys. Last month for a puja at my brother's place we were trying to come up with ideas for setting up the altar and other decorations. Since it was their new home we did not want to risk using traditional muggu (rangoli) colors and staining the floors. When looking for designs online I came across some that were made using kundan stones and that's when this got started.
Peeta muggu (to be placed under a 3" high stool - peeta)
Michael's is our go-to store for craft items and it was no different this time. We found a huge pack of assorted color acrylic rhinestones and with the 40% coupon it was a good buy for a impromptu project. Only drawback was having to sort the beads by color before we got started. But with some glue and plastic printer sheets we got started on our very first one soon.


Since then we've made many more...it's hard to stop and we knew we were spent our afternoons ordering stones on Amazon and our evenings scouring bead stores in the area for the right shape, right shade or the perfectly sized stone :)
another Padmam with a different petal tip design
For the first few muggu's we used Graffix Ink Jet film, but later realized it's a little too thin and flimsy for such a project. We currently have these sheets from Graffix that we ordered online. They are much more sturdier but the only downside is the color. I noticed that the sheet itself had a blue tinge only after opening the package. So if you can find clear sheets of the same thickness, that would be ideal.
Flower pattern - Not the best photo but my favorite so far
Since the sheets are transparent its easy to trace the pattern on a sheet of paper and attach it to the plastic sheet using staples or paper clips. Its best to move a few inches at a time, trace the pattern with glue (we used this) and immediately place the rhinestones. Do use a good amount of glue or the stones will fall out over time when handled...found that the hard way.

We also used pearl and silver bead strings for some of the outlines. My mother figured that the best way to make them fit the pattern is to leave them stringed until they are glued in place. While the glue is still fresh, gently tug at the string and pull it out. You can then make slight adjustments but its a lot easier than gluing beads individually. Once the glue has had time to dry, trim off excess plastic sheet around the pattern. We skipped this step for now and left a lot more space so they are easy to handle and move around.


This our most recent project and the one we are most proud of, I think. We spent many evenings visiting stores and looking online for the right stones for this one but it was definitely worth it. Its still not complete. My mom's done making all the petals (below pic) and we'll have to create the final shape by using some gold string to form an outline.
Materials & Sources
  • Acrylic Rhinestones - Various colors, sizes and shapes
  • Pearl and Silver beads
  • Sources: Michaels Craft store - don't forget to look for coupons; local bead stores/outlet; The Crafts Outlet - Amazon store, eligible for prime shipping;
  • Craft Plastic Sheets - we used these Graffix sheets, but in a clear color if you can find them (and let me know where!)
  • Glue - Aleene's Clear Tacky Glue
  • a pair of tweezers really come handy when you have to move little beads around
petals to go around the above circular center pattern - 8 total
Google stone rangoli and get prepared to be awed. There is soo much great work to be inspired by. I thought I had a brilliant idea when we were trying to find an alternative to traditional color powder rangoli, but looks like its been around forever. This was the first collection that inspired me, here's another that lead to our current project; and another one. The very first muggu is the one that will be at the base of our Varalakshmi vratham kalasam this year.

Did you worked on any craft projects recently ? Please share them here!
 

Sunday, August 11, 2013

Bajji - Vegetable Fritters

Dear Foodies,


The festive season has begun for some Hindu's with the onset of Sravana masam last Wednesday. My parents are here visiting and I get to experience firsthand again the various puja's and neivedyam that I very vividly remember from when I was home. The unmistakable aroma of ghee and cardamom from the kitchen, incense from the puja room, the melodious voice of M.S. Subbalakshmi or Sudha Ragunathan playing in the background and the whole house buzzing with energy. The entrance would have been decked with a fresh muggu (rangoli) and thoranam. Fresh flowers adorn the altar and all puja samagri cleaned and ready to go. I've tried my best to recreate these from memory in the last few years but its never the same. Having mom here has brought that all back. I've slipped naturally into my post as assistant along with my Dad.

Today is Garuda panchami, a puja performed by sisters for the well-being of their brothers. It is a special pooja in our home for both my mom and me - she has four brothers and I have one. This also signifies the start of a string of auspicious days for the season - Varalaksmi vratam is on Friday, followed soon by Avani avittam (Jandhayala pandaga/Rakhi), Janmashtami, Vinayaka Chavithi, Dasara and then Diwali.

Clockwise - peppers, green tomatoes, eggplant, potatoes
For a foodie though, all these festive occasions have one other important thing at their core - neivedyam. Each puja has its own set of customary dishes that make it special. Kozhakattai for one, kesari for another or bobatlu. But no special Andhra (/Telangana ugh) meal is complete with out bajji - fritters. Usually its thinly sliced potatoes dipped in a mildly spiced besan/chickpea batter and deep fried to puffy, golden deliciousness. Using just pantry essentials, these take no more than 15 mins, with prep time taking just as long as it takes for the oil to come to temperature. So no surprise then that these were perfect snack to offer to unexpected guests.


On Saturday, we spent all morning at Suzie's farm picking fabulous summer produce. We now have close to 10 varieties of peppers, lots of sun ripened tomatoes, beets, kale, chard, eggplant and squash. With all this fresh produce in hand we had no reason to stick to traditional potato alone. Instead we made a bajji sampler plate using sliced eggplant, padron peppers, unripe green tomatoes and potatoes. Onions are also great for bajji but since this was going to be offered as neivedyam we skipped it.

Bajji - Fritters with Potatoes, Brinjal, Green Tomatoes and Peppers 
Prep time: 15 mins
Cook time: 15 mins
Ingredients:
  • 1 cup - Besan/Chickpea flour
  • 1/4 cup - Rice flour
  • 1/2 tsp - Ghee or 1 tsp - Curd or 1 tsp - Rava/Semolina
  • 1/8 tsp - Turmeric
  • 1/4 tsp - Red chilli powder (adjust to taste)
  • 1/8 tsp - Ajwain (whole or roasted & powdered)
  • a pinch of Hing/Asafoetida
  • Salt to taste (~1/2 tsp)
  • Water, for batter
  • Oil for deep frying
Method:
  1. Prep veggies first - Scrub potatoes clean, wash all other veggies and pat dry. Peel potatoes if needed. Slice potatoes and eggplant thinly (1/8inch) by knife or using a mandoline. Cut stem end of peppers, de-seed and slice into discs. Green tomatoes sliced a little thicker than the rest.
  2. Heat about 1 inch of oil in a wide pan over medium heat.
  3. For the batter, combine all dry ingredients first. To make the fritters crispy add either ghee, rava or curd in the amount suggested. Add water to get the batter to a thick yet pouring consistency as shown above.
  4. Once the oil is hot (starts to shimmer and a small drop of batter falls to the bottom and rises up in a few seconds) dunk a few slices in batter and move them around to coat all sides. Pick up one slice at a time, allow excess batter drop, and gently slide it into the pan of oil from the side closest to you. Add a few more slices based on size of the pan making sure not to over crowd it.
  5. Using a slotted spoon, gently move the slices around 1-2 times, gradually spooning a little oil over them. Once the bottom part looks cooked (~ 1 min) flip over and cook until both sides are golden. 
  6. Transfer to a tissue lined plate for a few minutes to absorb excess oil. Move them to a serving plate or dish. They are great warm or at room temperature. Though they hardly need any accompaniments, a little Maggi sauce or mango avakaya on the side is wonderful.
Once you have the batter ready, you can experiment with almost all veggies. The tart green tomatoes were really good and so was the eggplant with a slight bitterness. Peppers (mirapakakya bajji) and potatoes (aloo bajji) hardly need any help in selling out. Cauliflower, cucumber, squash, spinach are all very good candidates. Last week we even saw someone on a cookery show dip rava kesari balls in this batter to make a hybrid snack! I may never go that far and plan to stick to just veggies.

We are busy making arrangements for Varalakshmi Vratam now and I hope to write another post this week about ourpreparations. My mom's Kozhakattai recipe now has new photos from today.

Friday, June 14, 2013

Corn Tacos with Mexican Slaw & Poblano Dressing

Dear Foodies,


I've been waiting all year long to share this recipe here. I discovered fresh corn tortilla's and tacos last summer and they were my staple food for a good month or two. But it was way past fresh corn season by the time I got around to putting the recipe together. This year I hope its right not time so you guys can enjoy it as much as I do. Summer in SD is not until July or August, we are going through what is called June 'gloom' right now. Overcast days with 60-65F temperature hardly feels like summer. One look at the farmers market stalls though and you'll know otherwise. Just like summer and mangoes will go hand in hand for me, its fresh summer corn that I look forward to here. The kernels are so tender and juicy that they hardly need any cooking. When separating the kernels form the corn, a good portion of it ends up being a snack. I nuke them in the microwave for 2-3 minutes while still in their husks sometimes. Once cool to handle, remove the husks, slide half a lime through the kernels, sprinkle salt, chili powder and call it dinner.


This taco recipe is filled with some of my favorite components. A stunning slaw has just three main ingredients - purple/red cabbage, carrots and jicama. I started using jicama only last year after watching a Mexican food show on TV. I had always seen them next to cauliflowers at the local store here but never really paid them notice. Eaten raw, jicama is super crunchy and has a mild sweet flavor. It's rich in fiber and adds a wonderful texture to salads. I dress the salad with a sharp lime dressing with lots of cilantro and a hint of cumin and chile powder to add zing. This simple slaw is clearly greater than the sum of its parts. Its perfect for picnics or do ahead scenarios as the veggies are sturdy enough to hold up against the acidic dressing for a few hours. And more importantly, it looks stunning on the plate!


If you make nothing else from this recipe, you should at least try the poblano dressing immediately. I use poblano's instead of green bell peppers in quesadilla's or stuff them with the sauteed corn and red peppers, a little cheese and bake them for a quick dinner. Once the poblano's are grilled/broiled it takes 5 mins to make the sauce. I use thick homemade yogurt, scallions, a lot of cilantro, some lime juice and roasted cumin powder. A few recipes call for garlic but I don't like its pungent flavor in raw form and avoid it here. Throw everything in a blender jar, give it a few pulses until the sauce to smooth and creamy. And its ready to be used as a salad dressing or a condiment for burgers and sandwiches.

For these taco's, I separated the kernels from the cob and charred them in a dry pan. Seasoned them lightly with salt and pepper. The star of the dish though are the vibrant slaw and poblano chile dressing that packs a punch. I make both every few weeks and store in the fridge for a few days. I made the slaw for a event at work a few weeks back it was enjoyed by all.

Corn Tacos with Mexican Cabbage slaw and Poblano dressing
Prep time: 45mins
Cook time: 15mins
Servings: 3-4
  • Corn Tortillas
  • Roasted/Charred corn (on an open flame or kernels sauteed in a dry pan)
  • Radish sprouts or any other kind of your choice
Mexican Cabbage-Carrot-Jicama Slaw
  • 1/2  - small head of Red cabbage, thinly sliced, approx. 3 cups
  • 1/2 - Jicama, julienned, approx. 1.5 cup
  • 3 - Carrots, julienned or shredded, approx 1.5 cup
  • 1/2 cup - Cilantro, roughly chopped
  • 1/2 tsp - Jalapeno/Serrano. minced or mexican red chile powder (adjust to taste)
  • 1 tsp - roasted, Cumin powder
  • 2-3 - Limes, juiced
  • 2 Tbsp - Olive oil
  • Salt to taste
  1. For the salad dressing, combine lime juice, olive oil, salt, chile and roasted cumin powder. Adjust seasonings to taste. I tend to use more lime juice in mine. Toss together all the veggies, cilantro and half the dressing adding more as needed. Set aside for 30 mins at room temperature or refrigerated to develop flavors.
Poblano Chile Dressing
  • 3 - Poblano chiles
  • 1 - Scallion
  • 1/2 cup - Cilantro leaves and tender stalks
  • 1.5 cups - thick plain Yogurt or (3/4 cup buttermilk + 2 Tbsp sour cream)
  • 1/2 tsp - freshly roasted Cumin powder
  • 1-2 Tbsp - Lime juice
  • 1/4 tsp - Garlic, grated (optional)
  • Salt to taste 
  1. Roast poblano chiles over a gas flame or under the broiler until charred all around. Transfer while hot to a bowl and cover with plastic wrap for 10mins. Once cool to handle the peel should come off easily, discard the seeds and membrane as well.
  2. Transfer coarsely chopped poblano, scallions, cilantro and yogurt to the blender jar and process until smooth. Add salt, lime juice and cumin powder to taste. Use immediately or store refrigerated in an air tight container for up to a 1 day.
Warm the corn tortillas lightly to make them pliable again. This can be done on a skillet or cover a stack of them in aluminum foil and place in a warm over for 10 mins. Spread out all your fixings on a table for a taco bar or assemble them as you go. Place a spoonful of slaw on the taco, top with charred corn, radish sprouts and finally drizzle a spoonful of poblano chile dressing over all of it, right before serving.

Notes: Swap charred corn with roasted onions & peppers or marinated and cooked tofu/mushrooms or crisp sauteed potatoes or well, the choices are endless. You can also add a zippy guacamole tomato salsa or tomatillo salsa as topping additions.

This is a perfect summer dish loaded with crunchy veggies and vibrant flavors that keep these tacos light and refreshing. Since its all about the fillings I like to use smaller tortilla's and prefer the flavor of corn tortilla's over flour. There are no strict rules with this though so make it your own and use flavors and ingredients you enjoy. Each component is good on its own too and can be used in many other forms. If I have left over salsa's and roasted corn or peppers I make a burrito bowl with the addition of black beans and rice. Add some steamed edamame, cranberries and toasted slivered almonds to the slaw for a light mid-week lunch.

Monday, May 20, 2013

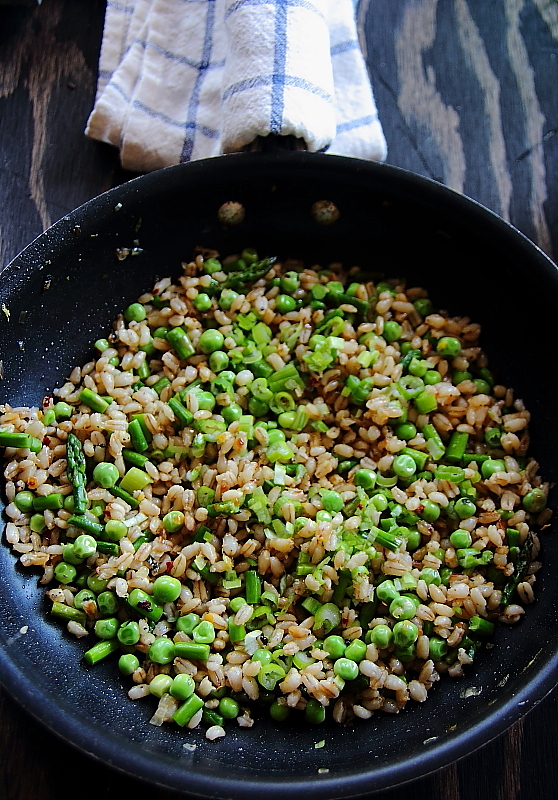
Spring Barley Salad

Hello Foodies,


It feels like spring and summer are fighting it out right now on who gets to stay. We had a few good days in between and then it was rain and cooler temps for a week. But a visit to the farmers market confirms that the veggies got their memo. The farm stands were either a lush green or filled with pops of color showing off nature at its best. My brunch if I go to the farmers market on a Saturday is usually samples from each of the stands ending with a cup of freshly cut watermelon, cucumber and mango spiked with lime juice and tangy chile powder.

It's hard not to fall in love with veggies when they are in season and picked fresh. I was never a fan of peas as a kid and hated that my mother would add them to everything when they were is season. But now I find myself doing the same. I shocked myself by snacking on fresh peas as I walked through the market and ate whole sugar snap peas and ended up liking it. Asparagus on the other hand don't have a long history since we never had them back home. My favorite way to make them is to quickly roast them at high heat with salt, pepper and olive oil or roasted in a dry pan on the stove top. In this dish I went for a quick saute as they were fresh and tender and wouldn't withstand much cooking.


In an effort to clean out my pantry be healthy, I've been using quinoa, wheat berries, farro, barley and brown rice instead of plain rice. Each of these have different cooking times and its hard to keep track. I have a whole grains cooking sheet on my refrigerator for easy reference but even that gets ignored most days. A few months back I tried cooking barley in my little electric rice cooker and it came out perfect. Since then I've cooked wheat berries, farro and brown rice in it and have had consistently good results. I use the same amount of water as I would for rice, slightly less for barley. Cooking it this way has definitely made it more convenient to swap whole grains for rice. If you can plan ahead, pre-soak whole grains for a few hours or a quick soak in warm water to cut down on cooking times.

I make a big batch of grains and have a stash in the fridge to use over a few days. This makes putting together a quick lunch salad like the one below really simple. Barley has a chewy texture, similar to brown rice but less nutty. Its almost neutral taste makes it a perfect grain to pair with mild veggies or spices. I add it to salads snd soups or use it in this Indo-Chinese fried rice recipe.

Peas & Asparagus Barley Salad
Prep time - 10 mins 
Cook time - 30 mins + 20 mins
Ingredients:
  • 2 cups - Pearl Barley, cooked
  • 1 cup - Green peas
  • 10-12 spears of Asparagus
  • 2 - Shallots
  • 1 Tbsp - Olive oil
  • 1 - lemon zest and juice
  • Salt, freshly ground pepper and red pepper flakes to taste
  • 1 tsp - Toasted sesame oil (optional) 
  • Spring onion greens for garnish
Method:
  1. Wash and cook barley grains in an electric rice cooker(1: 1.5 water) or on the stove top (1:2) as you would regular rice.
  2. Mince shallots and saute in a wide pan with olive oil. Chop asparagus in 1 inch rounds and saute for a few minutes, reserving spear tips to add towards the end. Add peas, salt and red pepper flakes next. Sprinkle a few drops of water, cover and cook a few minutes till peas wilt and turn a bright green.
  3. Add barley, more salt as needed and cook covered on medium low heat for 5-6 mins.
  4. Add 1 tsp lemon zest, 1-2 tsp of juice and black pepper to taste. I finished it off with a tiny drizzle of toasted sesame oil to add a nutty, aromatic flavor, but this is optional.
  5. Garnish with spring onion greens before serving it warm or at room temperature.
Notes: Swap with farro, quinoa or brown rice instead of barley. Other spring delicacies like fava beans, sugar snap peas would work too. 

This dish is all about the fresh peas and asparagus. Tender spring veggies don't need much in terms of cooking or flavor additions. A quick saute like this one helps tone down the rawness but still retains the bright fresh flavor and crunch. Barley adds a chewy texture and heft to the salad making it a meal itself. Use any spring veggies you have on hand - fava beans, snap peas, fresh onions and garlic, broccoli flowers.

Saturday, May 11, 2013

Color Splash - Farmers Market

Dear Foodies,


These are a few photos I took with my phone while walking around the Saturday morning market in Little Italy. This is one of the larger farmer's markets in San Diego county with a great selection of fresh and artisanal products. Just sampling the produce and snacks ends up being my brunch for the day :) I went back home with a bunch of these carrots and roasted them whole with some salt and pepper. Finished it off with squeeze of lemon and enjoyed them over tart sorrel greens and slivered almonds. I was surprised by how substantial the carrots felt and they tasted great. I was tasting sorrel for the first time and liked the tartness in them, they reminded me of some other green, may be chintha chiguru - tamarind leaves.
See the colorful cauliflower in the background ? Stunning, right. I have a recipe with them coming up soon.
Fresh Onions
Rainbow Chard
A multitude of colored beets
Berry nice! and of course there were a lot of fresh strawberries too
Chamomile tea anyone ?

Sunday, March 24, 2013

Tofu Veggie Hash

Hello Foodies,


I got through two books in two days this weekend. And I got 4 more from the library to read over the next few weeks. I go through these phases where I pick one hobby and do one project after another, crocheting, sewing, photography or reading. Its been a while since I picked up a good book and read it in one sitting. I have a hard time picking books, if I don't like the first few pages I'll never get through it not matter how good the reviews. Last year I read the books suggested by Tara Austen (Tea and Cookies) and enjoyed all of them. The library system here is just brilliant and I can find almost any book in the vast network they have. Each book on that list was very different from the other but they all were tied by the common theme of food. I love getting immersed in a book, living with the characters and anticipating how the story unravels. Even when I have to step away from the book I'm still in their world with them until I complete the book. A well written book can do that to you, drawing you into its imaginary world by creating life like scenarios. A movie not matter how good it is lasts just a few hours and is soon forgotten.


I picked the first book (The Mango Season by Amulya Malladi) at  random with just 5 mins to library closing. Once I got through it late that night I went back the next day and got a second one from the same author, Serving Crazy with Curry. I was so thrilled to have finished the book in one setting that I did not want to stop with one. Both were easy reads with well developed plots and characters. They also had little recipes strewn between the chapters which was nice. I picked up more books when I went back and is it odd that they all seem to have a food theme going on! ha. So as to not spend too much time in the kitchen I whipped up this quick brunch style dish to keep me with my books longer.

Tofu Veggie Hash
Prep time - 10 mins
Cooking time - 20 mins
Servings - 2 -3
Ingredients:
  • 3 oz - Tofu block, extra firm
  • 1/4 cup - Tomato, diced
  • 1/3 cup - Onions, Green & Red bell pepper, diced
  • 1/2 cup - Potatoes, cubed (Red or Yukon Gold)
  • 1/2 tsp - Cumin & Fennel seeds
  • 1/4 tsp - Red pepper flakes
  • 1/8 tsp - Turmeric powder
  • Salt to taste
  • 2 Tbsp - Olive oil
  • 2 - Spring onions greens for garnish
Method:
  1. Heat a Tbsp of oil in a saute pan on medium high heat. Add cumin & fennel seeds, once they begin to sizzle add red pepper flakes, turmeric powder, diced onions and peppers. 
  2. Meanwhile, peel and cube potatoes. Rinse them in water to get rid of extra starch. Drain tofu and cube in roughly the same size as potatoes.
  3. When the onions and peppers are tender and begin to char slightly transfer them to a plate and reserve. Add another tablespoon of oil to the saute pan and toss in cubed potatoes. Cook for 5-6 minutes without moving then too much so they can crisp up on each side. 
  4. Cubed tofu, tomatoes and sauteed veggies go in next. Add salt to taste and cook for 5 mins until the flavors meld together. 
  5. Transfer to a serving dish, garnish with diced spring onion greens and serve with fruits and toast. 

Hash is one of my favorite brunch dishes when I eat out and making it at home is even better. Potatoes and peppers go perfectly together and adding tofu brings protein and substance to the party. It soaks up the flavor from the veggies and tastes really good in the end. The different textures from the peppers, crispy and tender potatoes and tofu work well together. The fennel seeds add just enough interest along with the cumin seeds or I its just that I'm in a fennel phase now :) What are your favorite brunch recipes ? or weekend reads ?

Monday, March 18, 2013

Spread the Bounty

Hello foodies,

The final haul from one of our trips. And this was just half of it! We ran out of buckets and had to empty the fruit into a trunk of a van to be hauled out. Orange, blood orange, grapefruit, kumquats, tangerines, lemons, Meyer lemons, pomelos.
Nope, this was not a pick your own farm loot :) The last few weeks I've been spending my Saturday mornings volunteering for a wonderful organization called Harvest Crops. They work to bridge the gap between the haves and have not's of fresh fruit. Its a great cause and I am glad I am able to contribute.  Its a win-win situation for everyone involved and that's the beauty of it. Every resident we have helped is happy to have us there and welcome us into their homes and backyards. They are happy to see their fruit picked at its peak and taken to those who need it most. It just amazes me each time to see how many buckets we fill up from one tree. Even the barest of trees yields no less that 4-5 buckets of fruit. The best part of it all though is the last bit of delivering the fruit to those who need it. It leaves me with a smile that lasts through the whole week. This past week we picked just three trees but ended up with 20-25 buckets of fruit that would serve many many families. As a volunteer I am just having fun. I get to explore the city, meet new people and also sample some fabulous organic fruit. So to leave with so much more than what you put in is gratifying.
Meyer lemon blossom                                                                                                              Orange blossoms
California is known for its citrus harvest. The markets are usually stocked with multiple varieties of citruses all through the year, even the winter months, or should I say specially the winter months. Right now the farm stands are bursting with blood oranges, grape fruit and many lemon varieties  - meyer, eureka, sweet lemons and a few more names that I don't recollect right now. Drive out a few miles from the city and you are bound to come across orange orchards lining the road. But right here within the city almost every house that has even a few feet of open yard has a citrus tree or two that is bursting with fruit.
They all start green                                                                                        Orange bunches everywhere


Overloaded with Meyer Lemons!
The famous California Meyer lemons have a floral aroma and are sweeter than regular lemons. I've made lemonade, salad dressings, muffins, cupcakes and currently have a batch of preserved lemons curing in the refrigerator. The lemons from this tree are probably the juiciest and sweetest I've had till date. The tree was brimming with fruit but did not want to let go of them either. The fruit were nestled among the inner branches that had huge thorns! I was lucky we had gloves but that did not help us for long. We eventually just started jerking the branches to loosen the fruit and luckily for us it worked out.We got close to 10-12 buckets of fruit from this one.

Grape fruits!
This grapefruit tree was in a mini orchard that a resident had. From the outside the tree looked like it did not have much fruit. But once we took a peek behind the outer leaves, this is what we find! We got close to 6-7 buckets of fruit from this one alone. They were huge and juicy. But this was the day I also realized I have a very low tolerance to grapefruit. Its way too acidic for my throat, just a few drops and I was left with a soreness that lasted a whole day.

Ponderosa lemon blossom                                                                                  Ponderosa lemon
The shocker from last week was discovering Ponderosa lemons. Looking at how big the fruit looks in the photograph you might think the photo angle is odd. But nope, these lemons are enormous! The fruit were easily 7-8" in diameter. I initially mistook them to be grapefruit until the kind lady who lived there told us about these special lemons.
That's a blood orange for comparison alongside one of the smaller lemons on the tree. And if that's not big enough these lemons are still just half their size at this point! The wiki link tells that they taste exactly like lemons just a looooot bigger. More about blood oranges in the next post :)

Peach blossoms!
These flowers in pretty pink are peach blossoms I was told! Looks like we might go back to this place in a few months for another harvest :) Take a few minutes to see if such an organization exists in your neighborhood and I can promise you'll have a wonderful time.

Blogging tips