Showing posts with label homemade gifts. Show all posts

Wednesday, August 14, 2013

Homemade | Rhinestone / Kundan Rangoli

Dear Foodies,

Padmam - Lotus muggu
I'm going to take a detour from cooking on today as I can no longer keep this new craft that my mom and I (...mainly her :) ) have been churning out from all you guys. Last month for a puja at my brother's place we were trying to come up with ideas for setting up the altar and other decorations. Since it was their new home we did not want to risk using traditional muggu (rangoli) colors and staining the floors. When looking for designs online I came across some that were made using kundan stones and that's when this got started.
Peeta muggu (to be placed under a 3" high stool - peeta)
Michael's is our go-to store for craft items and it was no different this time. We found a huge pack of assorted color acrylic rhinestones and with the 40% coupon it was a good buy for a impromptu project. Only drawback was having to sort the beads by color before we got started. But with some glue and plastic printer sheets we got started on our very first one soon.


Since then we've made many more...it's hard to stop and we knew we were spent our afternoons ordering stones on Amazon and our evenings scouring bead stores in the area for the right shape, right shade or the perfectly sized stone :)
another Padmam with a different petal tip design
For the first few muggu's we used Graffix Ink Jet film, but later realized it's a little too thin and flimsy for such a project. We currently have these sheets from Graffix that we ordered online. They are much more sturdier but the only downside is the color. I noticed that the sheet itself had a blue tinge only after opening the package. So if you can find clear sheets of the same thickness, that would be ideal.
Flower pattern - Not the best photo but my favorite so far
Since the sheets are transparent its easy to trace the pattern on a sheet of paper and attach it to the plastic sheet using staples or paper clips. Its best to move a few inches at a time, trace the pattern with glue (we used this) and immediately place the rhinestones. Do use a good amount of glue or the stones will fall out over time when handled...found that the hard way.

We also used pearl and silver bead strings for some of the outlines. My mother figured that the best way to make them fit the pattern is to leave them stringed until they are glued in place. While the glue is still fresh, gently tug at the string and pull it out. You can then make slight adjustments but its a lot easier than gluing beads individually. Once the glue has had time to dry, trim off excess plastic sheet around the pattern. We skipped this step for now and left a lot more space so they are easy to handle and move around.


This our most recent project and the one we are most proud of, I think. We spent many evenings visiting stores and looking online for the right stones for this one but it was definitely worth it. Its still not complete. My mom's done making all the petals (below pic) and we'll have to create the final shape by using some gold string to form an outline.
Materials & Sources
  • Acrylic Rhinestones - Various colors, sizes and shapes
  • Pearl and Silver beads
  • Sources: Michaels Craft store - don't forget to look for coupons; local bead stores/outlet; The Crafts Outlet - Amazon store, eligible for prime shipping;
  • Craft Plastic Sheets - we used these Graffix sheets, but in a clear color if you can find them (and let me know where!)
  • Glue - Aleene's Clear Tacky Glue
  • a pair of tweezers really come handy when you have to move little beads around
petals to go around the above circular center pattern - 8 total
Google stone rangoli and get prepared to be awed. There is soo much great work to be inspired by. I thought I had a brilliant idea when we were trying to find an alternative to traditional color powder rangoli, but looks like its been around forever. This was the first collection that inspired me, here's another that lead to our current project; and another one. The very first muggu is the one that will be at the base of our Varalakshmi vratham kalasam this year.

Did you worked on any craft projects recently ? Please share them here!
 

Wednesday, December 05, 2012

Home-made Extracts


Dear Foodies,


Its December already and a year has flown by with its share of ups and downs. This space has also seen the ebb and flow of posts coming its way(or not!). Driving home from work today I almost contemplated closing this blog given the erratic updates. But something in me couldn't fathom not being able to log in and pen down my thoughts and recipes here. Its been over 6 years since I started blogging and it has slowly but firmly planted itself into my identity. I may not come here as often but I will never cut it off.

With my mind cleared out I was back to planning the 'butter+sugar' month. Though I come from a Hindu family, Christmas has always held a special place. I think its a combination of 12 years at a convent school, holidays around this time, having family friends who brought us decadent fruit cakes and home-made wine and the magic of experiencing an all-white Christmas in the US. I am not a baker and would peg myself into the cook category as I can never strictly adhere to a recipe. But come December I whip out the hand mixer, buy pounds of butter, sugar and flour and start compiling recipes to bake.


Flavor extracts are a key ingredient in many desserts, especially vanilla. Orange is another flavor that I find myself adding to most of my recent recipes. Its just as easy to add zest but having an extract on hand is convenient when you are out of fresh fruit or don't want to taint the color of a cream frosting or white chocolate etc.


There is not exact recipe for these -combine your choice of (prepped) flavoring ingredient + vodka (triple distilled, 80-100 proof) and allow it to steep in cool, dark place.
Homemade Extracts
Vanilla Extract
  • 2-3 Vanilla beans, split lengthwise
  • 3/4 cup - Vodka
  • glass bottle with lid/cork
  1. Pick a glass bottle that can hold a whole vanilla bean. Clean and dry completely. Place vanilla beans in the bottle and cover completely with vodka. Seal well and place in a cool, dark place in your kitchen. Give it a shake every day or so for the first week. 
Notes: Within 3 days you will begin to notice a light brown color and the extract was strong enough to use within 2 weeks. A month would be ideal but if you want to use it sooner start off with extra vanilla beans. I used 4-5 beans in my current batch and add more vodka as I use some of it. I buy my vanilla beans on Amazon from this supplier, its a great deal and the quality has been great. You can use vanilla beans in the extract for recipes as well. They will be super moist and you can squeeze out the seeds easily.

Lemon/Orange Extract
  • 1-2 - whole organic lemons or 1 orange
  • 3/4 cup - Vodka
  • glass bottle with lid/cork
  1. Wash and dry fruit thoroughly before peeling off the thin outer layer. If any white pith remains, slice it off with a paring knife as they tend to add bitterness. Fill the bottle with peels and cover completely with vodka. Seal well and place in a cool, dark place in your kitchen. Shake the bottle gently one a day for 2-3 days. Check for readiness after a week or continue to steep longer.
Notes: Use organic fruit or fruit not treated with pesticides or wax coating since we will be using just the peels here. I wanted the extract to have a strong citrus flavor and used a high zest to vodka ratio. Some recipes I saw online suggested straining the extract after a month but I've had mine steeping for about 3 months now it had not turned bitter on me. But do check on your batch and strain if needed after you are satisfied with the flavor.

You can apply the same method to make flavored liqueurs. Below are raspberry and lemon (my take on chambord and limoncello) liqueurs getting ready to do their thing. For the raspberry (which was my fav of the two), I used 2 pints of organic berries and 2 cups of vodka. After steeping for 2 weeks all the color from the raspberry transfers to the vodka along with the their fabulous flavor. Strain gently, and add equal quantity of cooled simple syrup to the flavored vodka. Simple syrup is a combination of equal parts sugar and water heated just  until sugar is melted. Allow it to cool completely before adding to your vodka. Store for another 2 weeks before its ready to be served. A similar process for limoncello as well - reference recipe.

These make perfect gifts to anyone who loves to bake or enjoys cocktails. They don't require much hands-on time once you have the bottles filled and stashed. I bought the smaller bottles at Michaels and the larger ones at Marshalls for a bargain.

These extracts will immensely improve the quality of your baked goods. The flavors are strong and provide a depth that can never be replicated by store bought ones. So far I've made - Cranberry Pecan Muffins using the recipe from America's Test Kitchen (register to read recipe + useful tips & tricks, or check this). These were perfect with a prominent cranberry flavor, just enough sweetness and a fabulous nuttiness from the pecans. The streusel topping stayed crunchy even the next day. Do give it a try before fresh cranberries disappear from the store aisles.

I attempted my first batch of macarons using Helene's tutorial. No two macarons were the same shape but they all tasted great :) Next on the list was replicating my favorite treat from Starbucks - cranberry bliss bars. I searched for recipes online and ended up with this one. I used vanilla and orange extract in the blondie batter. I made the frosting with 8 oz cream cheese, 1 cup powdered sugar and my vanilla and lemon extract. I also replaced the sugar frosting drizzle with melted white chocolate. The bars were a huge hit and the cream cheese frosting was amazing with that zing of lemon.

I bake these goodies and share them with my colleagues at work. What should I try next, any suggestions ?

Thursday, December 22, 2011

Cookies Galore - Sweet, Salty & Spicy!


Dear Foodies,


Is your baking done, kitchen cleaned, gifts wrapped & mailed ? Sigh! My kitchen counters are still covered in flour, sticks of butter softening and the to-do list has a few more pending things on it. Since this is the one time I take up baking I try as many recipes as I can and there's just soooo many tempting treats popping up all over. It's extremely difficult to stop myself from trying just that o.n.e more cookies recipe. So if like me you have a few more batches to make, I've put together a very easy recipe that you can customize to your liking and crank out goodies in just a few hours!

The next three cookies are based on my shortbread cookie recipe here & here, both fantastic by themselves. This has become my go-to recipe because its really easy to create variations. The basic formula  used for all of these is - 1 stick (1/2 cup) Butter, 1/3 cup Sugar,1 cup AP flour + 1/2 cup Almond meal (or 1.5cups AP flour), a pinch of Salt  - then I add flavorings to make each batch unique.

Lets begin with chocolate, shall we...
3Tbsp unsweetened Cocoa powder + 1/2 tsp Instant Espresso powder + 1/2 cup toasted Walnuts +1tsp Vanilla extract

1/4 cup each chopped apricots & cranberries + 1tsp Vanilla extract

1/2 cup grated Parmesan cheese + 1Tbsp chopped Rosemary + 1/2 tsp Sea Salt + 1Tbsp Sugar (instead of 1/3 cup) + substitute 1 stick butter with 3/4 stick butter + 1/4 cup extra virgin Olive Oil

You can make so many more combinations of these shortbread cookies - different fruit & nut combo's -Apricot & Walnut, Cranberry + Pistachio, Cherries + Almond - Thyme + Parm cheese, toasted Cumin, Lemon zest & poppy seed, Deb has one for margarita cookies!!

Another great thing about this cookie dough is that it freezes really well. If you don't want to bake them right away then freeze the dough wrapped in cling wrap. Bring the log out whenever you want fresh cookies and slice just as many as you want. A fresh baked cookie will never be far off with a log of these in your freezer. For the detailed recipe see this post.
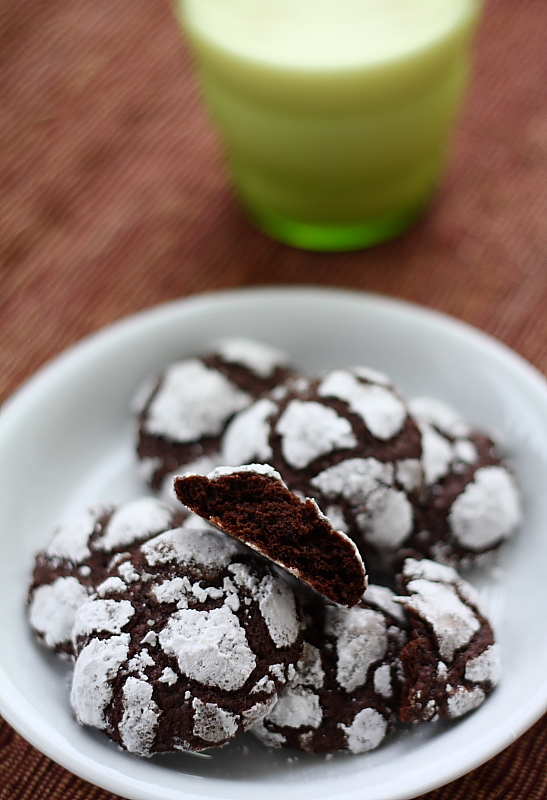
Chocolate Crackle Cookies
This is a recipe I tried the same day that Jen @Use Real Butter posted it, and the cookies were fantastic! Soft and chewy in the center with a crisp crust of sugar on the outside. It has a rich chocolate flavor and isn't overly sweet at all despite the outer coating.


I meant to post detailed recipes for the Linzer cookies & Gingerbread but with all the other stuff going on I was pressed for time. I wanted to at least share the ideas here before everyone gets busy with celebrations, so here you go....

Linzer cookies were based on Ina Garten's recipe, the only change I made was to substitute with 1.5 cup of almond meal for AP flour and added zest of 1 Lemon & Clementine. The best part though - homemade Raspberry jam & Peach Ginger jam.

My first batch of gingerbread cookies! This recipe is from Deb @smitten kitchen. I halved the recipe, added 1/8 tsp All Spice powder & 1Tbsp finely grated crystallized Ginger - fabulous! I also tried her recipe for goldfish crackers and they were sooooo good and easy to make and taste so much better than the store bought ones, but that's obvious I guess.

Homemade Cookie Sampler
I saved up to-go plastic containers that came with my sandwich lunches and turned them into the perfect cookie box. The savory cookies get their own little bag so they don't get a coating of sugar. And voila! You have a fantastic selection of cookies to please everyone. A little round of fruit cake wraps up the gift box and its ready to delight a loving family or friend. I think I'm done working with butter and sugar for another year, phew!

Have a beautiful holiday season filled with the things you love!

Thursday, December 15, 2011

Decadent Chocolate Truffles

Dear foodies,


Any celebration is incomplete without chocolate. I know very few people who dislike chocolate and am glad for those few cos it gives us chocolate lovers more to enjoy :) In India, Cadbury's fruit & nut was my absolute favorite chocolate bar and still continues to be. Kitkat, Crunch etc were picked up once in while but Cadbury's was always the most sought after. When I shop at the Indian stores here, they very sneakily have the little bars right next to the register and its tough to ignore the call of chocolate :)

My aunt (mom's sister) once gave us homemade chocolate as a gift and it felt like pure magic to me. Chocolate. at home ?! It couldn't get any better, she'd stir in raisins and cashews at the very end before spreading it out on a greased plate replicating our beloved fruit & nut combo. For years after that the recipe was requested over and over again when we visited her place. My mom learned it from her so she could appease our cravings at home. Even to this day chocolate holds a special place for me and brings the same joy and warmth that it used too and that's magic of chocolate.


When I saw the recipe for chocolate truffles on one of the cooking shows a few years back I was surprised it was that easy! I couldn't believe I was paying 20-30$ for 6/10 pieces at the store when I could just as well make many more at home! Tricked yet again! I've been making them during Christmas for the last 3 years and it never fails to surprise & delight those I gift it too. Every year I experiment with different dried fruit to coat the truffle's. Last year my entire counter top and utensils were covered in chocolate because I tried my hand at tempering chocolate for the outer coating. The end result was good but I chose to keep my sanity this year and focused on the other things. When the chocolate is good you don't need to mess around with it.

With more and more people baking at home and preferring made-from-scratch homemade goodies, good quality chocolate it not hard to find. Specially this time of the year most specialty food stores sell them in bulk and I take advantage of that. All you need are two key ingredients - chocolate and heavy cream, so the quality of the end result depends heavily on the kind of chocolate you use. I prefer using bulk baking chocolate rather than chocolate chips. Chocolate chips also contain stabilizers and are not recommended for truffles in most recipes. I bought semi-sweet Callebaut blocks, Valhrona milk & dark chocolate chips and cocoa powder from Whole Foods this time. I like that they sell them in smaller quantities making them more affordable. I tend to use about 80% semi-sweet and 20% milk chocolate to balance out the sweetness in these truffles.

When chopping chocolate a serrated bread knife is your best friend. The sawing action of the serrated knife does a great job in creating smaller chunks with less elbow grease. Having the chunks more or less uniform and in a small size ensures that they melt evenly when hot cream is added to them. Heat cream over stove top just until you start seeing little bubbles appear around the edges.

Using a strainer to catch any skin formed, pour cream over chocolate pieces and let stand for a few minutes allowing the heat to disperse and begin melting the chocolate. Gently stir with a spatula incorporating as little air as possible as this allows for a smoother, richer ganache.

Initially as you fold in the cream it might look like you are headed for a disaster but keep at it and soon you will be rewarded with a glossy, shimmering decadent ganache. At this point you can use the ganache to (a) fill little pastry tartlets, (b) dunk shortbread cookies and allow to set or spoon over a cake (c) whip it up with a hand-held mixer to make a wonderfully rich & airy chocolate frosting or (d) cover in plastic wrap and chill to make truffles later. Decisions, Decisions!

Don't let your OCD scrape out every bit of chocolate from the spatula into the bowl. After all this hard-work you've earned yourself the right to lick it clean!

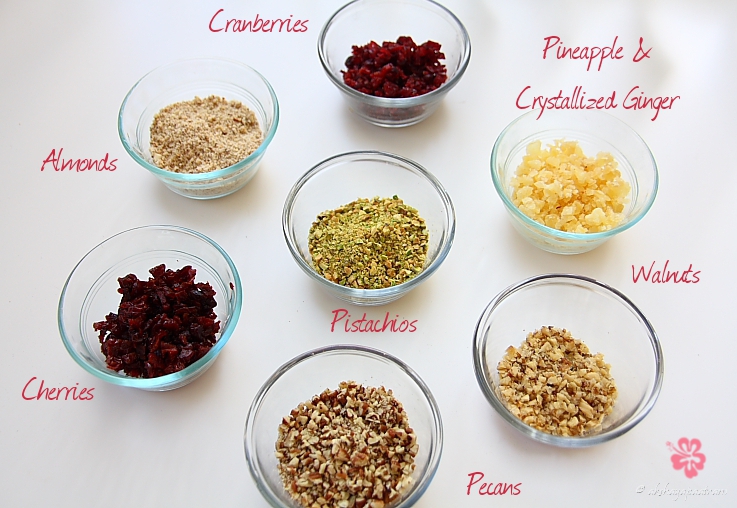
As the chocolate ganache cools off in the refrigerator to harden we've got lots of chopping to do. I used chopped toasted - pecans, almonds, pistachios & walnuts. For dried fruit we have - chopped cherries, cranberries and for the surprise element mixed pineapple and crystallized ginger. And lets not forget the classic - cocoa powder.

Take a scoop of ganache, roll it between your palms to shape it and it also softens the exterior a bit making it easy for the coatings to stick. Dunk them in the nuts or fruits and cover them with evenly all around, then lightly roll them between your palms to press in the nuts.

Chocolate Truffles
Yield - approx 50, 1" balls
Prep Time - 1hr
Ingredients:
  • 1 lb - Chocolate, (0.8lb semi-sweet, 0.2lb milk chocolate)
  • 1 cup - Heavy cream
  • 1/2 tsp - Instant Espresso powder 
  • tiny pinch of salt
  • Optional flavorings - 2 Tbsp of flavored liqueur (Orange/Almond/Hazelnut/Raspberry); 1/2 tsp Cinnamon powder, Cayenne;
    Toppings/Coatings - quantity depends on size of truffles & total no.of toppings used. You could start off with 1/2 cup and add more as needed.
    • Nuts - Toasted, chopped Pistachios, Pecans, Almonds, Walnuts, Hazelnuts
    • Dried Fruit - Cranberries, Cherries, Pineapple, crystallized Ginger
    • unsweetened Cocoa powder, powdered Sugar, 
    Method:
    1. Break down the chocolate into smaller chunks by chopping it and place in a large bowl. Heat cream on medium heat until it begins to bubble around the edges.
    2. Gently pour the hot cream over chocolate using a mesh strainer to catch any skin that forms on the cream. Add espresso powder and let the mixture stand for a few minutes.
    3. Using a silicone spatula gently fold in the cream incorporating as little air as possible into the now melting chocolate. Now is the time to add flavorings as well.
    4. Once you arrive at the glossy ganache stage, wrap the bowl with plastic wrap and move it to the refrigerator to cool for as long as it takes to harden ~ 1-2 hrs.
    5. When ready, I use a small scoop (Size 100 - 3/8oz) or a teaspoon to get uniform truffles and shape them by gently pressing & rolling between your palms forming a ball. Roll them in our choice of toppings and roll again between your palms to help the nuts/fruit adhere to the chocolate. Arrange them on a non-stick baking sheet or wax-paper lined tray and allow to cool for 1-2hrs.
    6. Bring them to room temperature before serving.
    Notes: Last year I 'stuffed' the ganache with some of the drained, soaking fruit I had from the fruit cake, so you can definitely go that route and hide a treat inside the chocolate. Chocolate - I used Callebaut semi-sweet and Valrhona milk chocolate for these Storing - You can make the ganache and stash it in the refrigerator covered in plastic wrap for a few days and scoop out truffles when needed. I've also refrigerated finished truffles in an airtight container and they keep well upto a week. They never usually last longer than that and so I do not know how long they can be stored :)
    Homemade Truffles sampler bag
    When you serve it to friends & family I can assure you that it'll be followed by a moment of silence. They will want to focus on the magic unfolding in their mouth as the rich chocolate melts away. These are a chocolate lovers delight! The nuts and fruits offer a variation of texture and a counter balance to all the richness. But I guess I don't have to try to put the brilliance of these truffles in words, you need to try it for yourself. This is another fabulous gift that shows you care about the person receiving it.

    Sunday, December 11, 2011

    Homemade Raspberry Jam

    Dear foodies,

    Please don't be surprised seeing a jam recipe here right after my post claiming that baking season was upon us. This is all part of the plan :) Britannia had these little sandwich cookies with a dollop of jam in the center that I loved. The crumbly cookie with a chewy, gooey jam center was a special treat that I looked forward too. From the time that I spotted the recipe for Linzer cookies I've been meaning to make them. This past weekend,  with a 50% off store coupon for Micheal's I finally bought myself a linzer cookie cutter set. I searched online for recipes that did not use eggs and had all other ingredients on hand. The one thing missing was the center jewel - raspberry jam which makes the quintessential linzer cookie. To break up the red I already had my peach jam on hand and also made a batch of clementine marmalade to top the cookies(recipe coming up). I decided to try my hand at making a batch of raspberry jam at home after a quick search for recipes.


    When ripe, raspberries strike a perfect balance between tart and sweet. They are rich in antioxidants and vitamins making them a delightful addition to any snack/meal. I was lucky to find fresh berries that tasted really good at the store here but frozen would also work perfectly for this recipe. Raspberries have a moderate amount of naturally occurring pectin in them. With a bit of sugar and some citrus juice they can be turned into a beautiful jam without needing any additional pectin. One less ingredient to shop for...

    Homemade Raspberry Jam
    Yield -  1 cup
    Cooking time - 30-40mins
    Ingredients:
    • 12 oz - Raspberries (2 little boxes, or use frozen)
    • 1/2 cup - Sugar ( I used sugar in the raw, adjust final amount to taste)
    • 2 Tbsp - Lemon juice (~ 1/2 lemon)
    • pinch of salt
    Method:
    1. Wash the berries and drain off any water. Place 2-3 stainless steel spoons in the freezer for testing doneness of jam in the end.
    2. In a non-reactive saucepan combine berries, sugar, lemon juice, salt and place on medium heat. Using the back of a ladle mash the berries along the sides of the pan. 
    3. Turn up the heat to medium-high and bring the fruit mixture to a rolling boil. Carefully skim any foam that appears on the surface. I try to push all the foam to one end and that makes skimming easier. Cook for 10-15mins while stirring frequently. 
    4. When the jam starts to thicken and acquires a gel like consistency, remove from heat and check for doneness. Take a spoon out of the freezer and transfer a half teaspoon of jam. Return it to the freezer and check on it after 2-3 mins. When tilted vertically if the jam stays put then its done, if not move the jam mixture back to the stove top and cook for a few more minutes. Test again until you get the desired consistency right.
    5. I chose to keep the seeds but if you want a smooth jam them immediately transfer to a thin sieve and push through as much of the jam as possible with the help of a spoon into a glass jar. (Or start off by first blending the berries in a blender to crush the seeds in Step1)
    6. Once cooled cover with a lid to make an airtight seal and store in the fridge for up to a 2-3 weeks.
    Note: Frozen berries can be easily swapped for the fresh berries here. Adjust the quantity for sugar to your taste, since its not made for long term storage the sugar here does not act as a preservative.
    I made a small batch and so did not bother with canning techniques. But to ensure that the glass jar is completely dry & sterilized I nuke it in the microwave for 30secs and cool it before filling it up with jam. Even when stored in the fridge check on it after the first week to make sure that its still good for use each time you take it out.

    For a recipe this simple the result is fantastic. Its amazing how quickly you can make small batches of jam right at home with so few ingredients. No chemicals or unpronounceable ingredients here. The jam was tart and sweet and the hint of salt balances out everything for me. They jam has deep jewel color studded with seeds all over. I enjoy the crunch of the seeds in this jam and it also makes for a gorgeous presentation. Use it simply on piece of plain bread for breakfast or make linzer cookies with it, either way you'll love it. Best of all it could easily make a pretty gift for someone you love or would like to thank this season. It does not take much effort but will surely make the person receiving it feel special.

    Which home-made gifts do you like the best ?
    Blogging tips