Happy Birthday Meeta !
Dear foodies,
 Dulce deLecious !
This is the recipe for the most sinfully good ice cream. From the moment I got the first taste of Haagen Daaz
Dulce de Leche, I was hooked. All my frnds here were hooked, we have bought sooo many boxes of it and none lat for more than a day or two. If you have not yet tasted this flavor yet, I urge each one of you to go find it ASAP !! It has a smooth caramely taste to it and as you can see in the picture on their site, it has twirls of caramel in it too. As if it were a treasure hunt, we would dig out all those pieces of caramel the moment the box was opened. Once I got the hand blender and knew I could make ice cream with its help, I just had to try making dulce de leche at home. And I must confide with you guys that I think I have come up with a perfect recipe for it. Yayyyyyy
 The nuts are only for the contrast in the pic, the ice cream needs no such embellishments :P
Now such a delectable dessert is a perfect present for an even more gorgeous person.
A very Happy Birthday to you Meeta ! It is wonderful to have known you through
your blog. Your warmth, your passion for food, photography and life with all its varied colors comes through to us by your posts. You have surely raised every day food to the level of an art form ! The love and thoughtfulness with which you treat each dish inspires me to treat it the very same way in my kitchen too (
and I must add it is a tough thing to do ;)). I have learnt a lot from your recipes or more so from your method of cooking, to keep it simple, accenting a few main flavors to bring out the beauty in a dish and also to be extremely daring at the same time ;). The next step now is to get hold of a good cam so I can seek your tutelage in that area too :)
 When I had dulce de leche for the first time I was reminded of the taste of theratipaal or kalakhand, the flavor of milk reduced to more than 1/4th its volume. I was curious to see how it was made and did a google search. And the most common method seemed to be the most weird and craziest way ever. The can of condensed milk was to be punched with a hole and then immersed in water and set to boil for about 1-2hrs. I am not sure if I understood what they said. How can u pierce it and immerse it in water and still make sure it does not ooze out ! There was also a warning about chances of the cans exploding, now how much more crazier could it get. All that needed to be done according to me was cooking the condensed milk with indirect heat. I am not patient enough to set it on a double boiler and baby sit it for hours, so I choose the easier way out and used the oven instead. The result was an amazing caramel and I had to hold my self from eating it by the spoonfuls so I could save some for the ice cream :P. All of you just have to try this ice cream. And have you tried eating the plain sweetened condensed milk ?? I guess I have to change the recipe to 1 1/2 cans only ...:))
Ingredients:
Equipment needed:
- Ice cream maker or Hand Blender & plastic container big enough to store the ice cream
- Pyrex dish & a larger Baking pan to hold the pyrex dish (I used a 8" x8" x2" pyrex & 11" x 7" x 2" rectangular pan)
- Sauce pan to boil the cream in and a wooden spatula.
For the dulce de leche you need:
- 2 cans - Sweetened Condensed milk (14 oz each) at room temp
For the ice cream:
- 1 pack - Half & half, ( I used the traditional one) (32 oz, I think)
- 1 1/2 Tbsp - Corn starch (corn flour)
- Sugar as per taste (I used about 5-6 tsp)
Method:
- Pre-heat the oven to 375deg C.
- Empty the two cans of condensed milk into the pyrex dish. Fill 3/4th of the larger baking pan with water and place the pyrex dish in it. Place these very carefully into the oven. I placed them on the upper most rack.
- Bake for about 40-50 mins stirring with a wooden spatula every 10-15 mins. The cream colored condensed milk will turn into a nice brown caramel color.
- Meanwhile empty the half & half into a saucepan and bring it to a boil.Stir some cold water/cream/milk into the corn starch and add it to the cream in the saucepan. Simmer for a little while till it starts to thicken. Turn off the heat and allow it to cool.
- Once the condensed milk is cooked turn off the heat in the oven. The water in the baking pan if going to be boiling hot so be extremely careful while moving the pans. I left the oven door ajar for abt 20mins and waited till the temperature of the pans was comfortable enough to handle. Very carefully remove the baking pans out of the oven. Do use oven mits at every stage.
- After both these mixtures cool down a little (luke warm), bring them together in a plastic container and blend for a few minutes. Taste the mixture and add sugar if required.(Transfer to the Ice-cream maker and follow the manufacturers instructions at this stage)
- Place the ice cream in the freezer and blend it in intervals of 30-45 mins for about 3 hrs before allowing it to set.
 The ice cream was absolutely delicious, it tasted exactly like the store bought one, or infact better than the store bought one....I urge each one of you to try it, no matter how small a batch !! Like I said, the original has twirls of caramel in it, which is the best part of the ice cream, but this one has that flavor all through....in every little bite or lick or slurp :) This ensured that none of us had to fight to get all the caramel bites in our spoonfuls, but could peacefully enjoy our bowlfuls :D Another thing with this ice cream is that it came out perfectly creamy unlike the mango ice cream that was more of a sorbet. From the tips I got in the comments section of the Mango ice cream post, I decided to boil the cream and milk and also thicken it a little to help build the creaminess. I hope I have convinced you all to try this one, even if I you are not convinced do make it and then you will be charmed for life !! ( I hope this one did it ;))

Meeta, this bowl is for you, I would have wanted to do some thing filled with chocolate but this one is definitely comparable :D I can't wait to see this months MM-Big Birthday Bang round-up..I can already see so many yummy dishes on their way there in the blogosphere :)


 Purple Passion
 I used the recipe that you will find here as a guide. I definitely made a few additions and subtractions to it. I used Half n Half instead of the whipping cream just cos I had some with me. My roomie is not a huge fan of berries and I was not sure if she would like an ice cream with that flavor and so I added some chocolate flavor. The fact that I love chocolate has nothing to do with this addition :P
 Go ahead and try this combo or any other that captures your mood, it is sure to be a hit :)


 These were really good and paired with the mango ice cream, it was fantastic. My friends and I just loved them. They really matched a cheese cake in flavor and the fruits inside were a neat little surprise. I filled each cup with a different combo of the three fruits. The roasted jack fruit was really yummy. It gave a nice bite to the otherwise smooth tart. The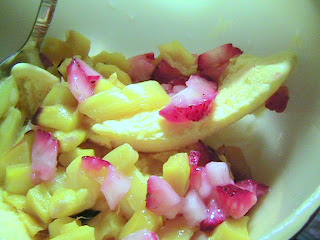

 Being a true Indian, whose heart starts to ache for Mangoes just as soon as the Sun peeps out in the summer, the flavor of the ice cream was decided ! I cannot find


